Tx Backpack Setup

Transmitter Backpack Firmware Guide
Most of the ESP-based ExpressLRS modules come with the TX Backpack. A "TX Backpack" refers to an additional WiFi-capable microcontroller inside the TX module, which can communicate wirelessly with "Backpack receivers". This allows the TX to communicate with other devices such as your Goggles (to change VRX channel), race timers, antenna trackers, ground control stations, etc.
Setup
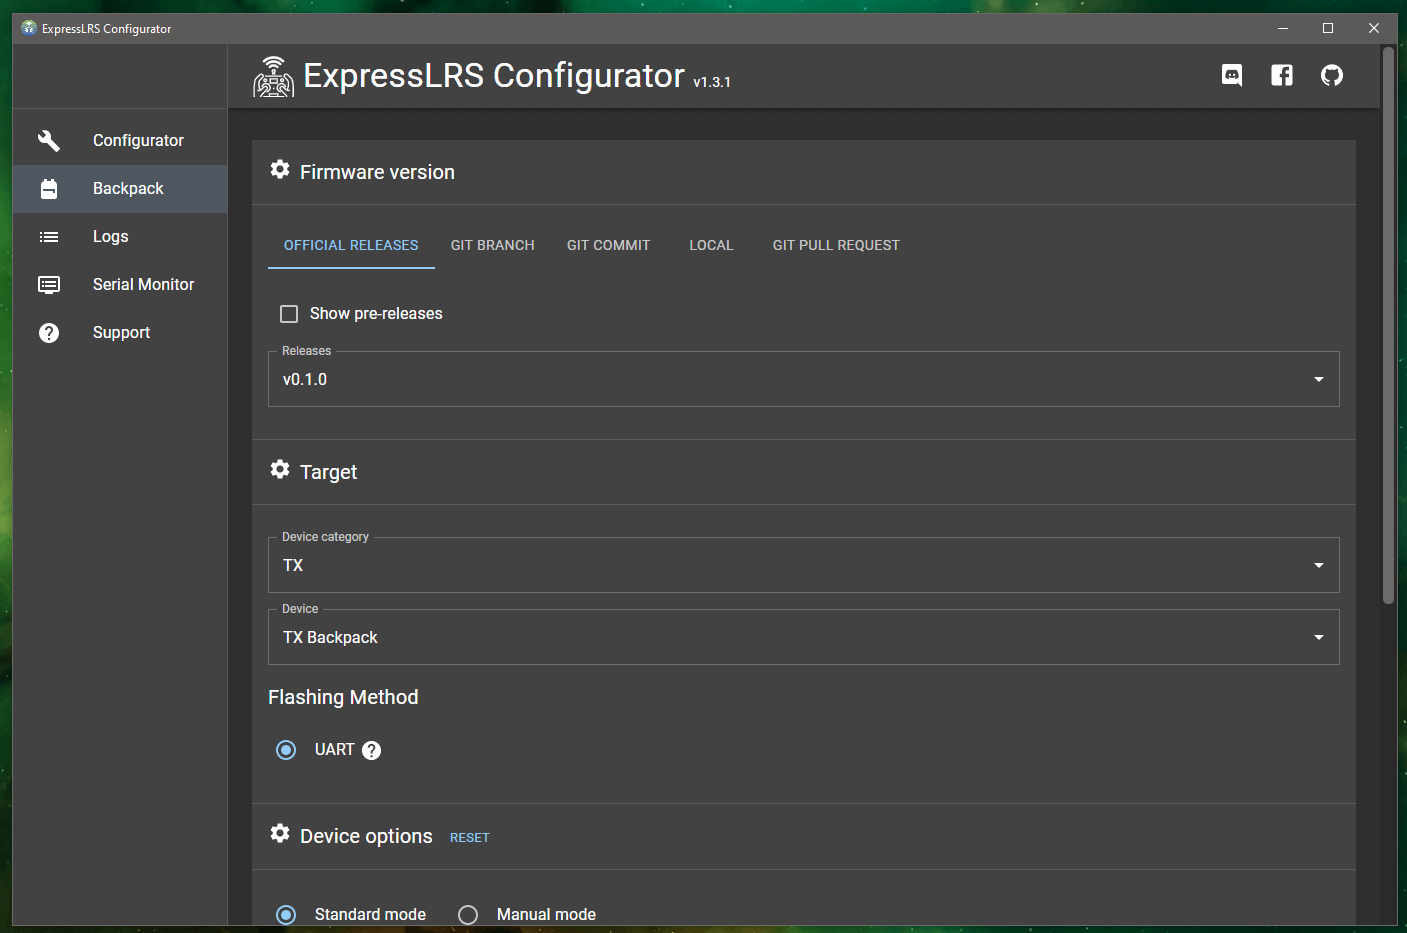
- Open the ExpressLRS Configurator and select
Backpackin the left hand menu bar. - Select the latest Backpack Release version from the
Releasesdropdown. - Select your device target. If there is a target that matches your hardware, use it. If you can't find a target that matches your TX module, use the
Generic backpack for any TX moduletargets. - Enter your Binding Phrase and your Home WiFi SSID and Password (Optional).
- Choose your
Flashing Methodbased on your hardware (choose from the options below):
Flashing via USB/UART (for older TX modules with DIP switches / jumper pins)
Applies to: Older TX modules that have DIP switches or jumper pins, e.g. Happymodel TX modules. Recent transmitter modules do not required any preparation prior to flashing the TX-Backpack firmware. If your TX module does not have any DIP switches or jumper pins, you can skip this step, and proceed to flash via Passthrough or WiFi.
For older TX modules like the Happymodel TX Modules, you will need to move the jumpers or DIP switches into the correct position before flashing the firmware. Please see the USB/UART Flashing section of your particular TX Module for the jumper or DIP switch position.
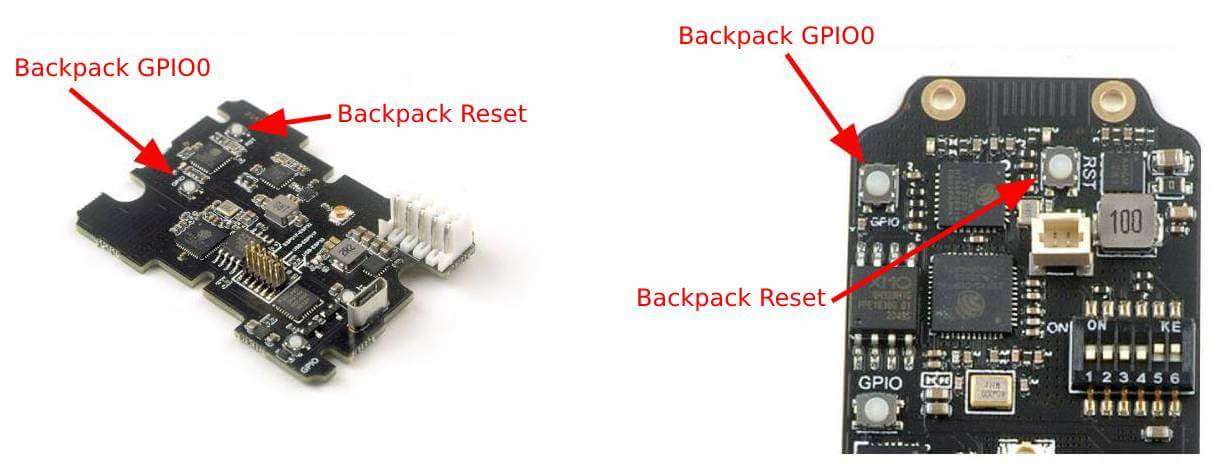
You need to activate the Backpack Flashing jumper or DIP switch (middle pair). Opening up the module enclosure will be needed as well to access the Buttons on the modules. Make sure your computer recognizes your TX module as a USB to UART Bridge. Windows drivers are linked in the Flashing Guides.
For the NamimnoRC Flash and Voyager TX Modules without an OLED screen (Gen 1 STM-based), make sure you're able to access the Backpack Web Update page (see Flashing Guide) via WiFi.
For the Happymodel TX modules, connect to your computer via USB. As stated above, the module should be detected as a USB to UART Bridge and the jumper/DIP switches are set in the correct position (middle pins/switches should be On).
Button Dance: A few buttons are needed to be pressed on the module while the firmware is compiling. Press and Hold the GPI0 button then the RST button (GPIO is still pressed) then release the RST button and then the GPIO button.
- In the Configurator, select the
UARToption underFlashing Method. - Ensure you have completed the steps in the Setup section above, then click
Flashon the ExpressLRS Configurator. - Wait for the process to complete and you should see the green
Successnotification. - Unplug the USB and change the position of the jumpers/DIP switches for the
Normal Operation(refer back to the module's Flashing Guide page for the correct position). - Put back the cover of the module and attach it to your module bay.
Flashing via Passthrough
Applies to: Newer TX modules that do NOT have DIP switches / jumper pins, e.g. Radiomaster Ranger Series
- Plug a USB Data Cable into the TX module.
- In the Configurator, select the
Passthroughoption underFlashing Method. - Ensure you have completed the steps in the Setup section above, then click
Flashon the ExpressLRS Configurator. - Wait for the process to complete and you should see the green
Successnotification.
Flashing via WiFi
Applies to: All TX modules that have a Backpack (this method assumes that the Backpack firmware has been flashed in the past and is functional).
- Using the ExpressLRS Lua script, navigate to
WiFi Connectivityand selectEnable Backpack WiFi. - The LUA script will briefly show
Sending, then return to the WiFi menu. - The Backpack WiFi Access Point (or Home WiFi, if you enabled it) will activate.
Home WiFi
With your Home Network SSID and Password set, when you activate the WiFi mode via the Lua script (WiFi Connectivity -> Enabled Backpack WiFi), the Backpack will try to connect to your Home WiFi Network. Once connected, you can access the Web Update page via http://elrs_txbp.local/ and upload your firmware there.
- If you are NOT using Home WiFi, connect to the
ExpressLRS TX BackpackWiFi access point (password isexpresslrs) and navigate your browser to http://10.0.0.1/. - If you ARE using Home WiFi, navigate your browser to http://elrs_txbp.local/.
- In the Configurator, select the
WIFIoption underFlashing Method. - Ensure you have completed the steps in the Setup section above, then click
Flashon the ExpressLRS Configurator. -
Wait for the process to complete and you should see the green
Successnotification. -
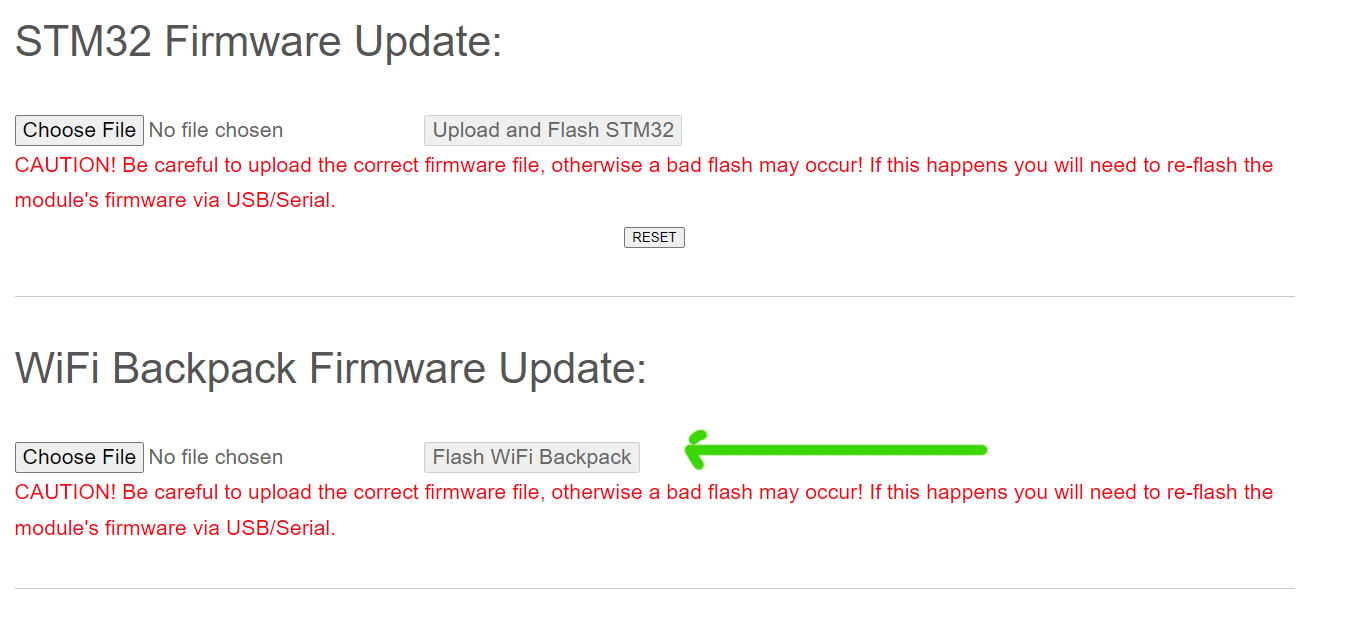
Alternatively, you can build the firmware file, then drag it to the WebUI. To do this, ensure you have completed the steps in the Setup section above, then click
Buildon the ExpressLRS Configurator. - Grab the built
firmware.bin.gz(do NOT extract it) and drag-and-drop it into the File Upload section of the webpage. If you are using an ESP32 based Backpack, the filename may befirmware.bin. Drag-and-drop it into the File Upload section of the webpage. - Click
Update. Wait a bit (~10s) for the "Update Success! Rebooting...". The AP should automatically disappear and disconnect.
Flashing via WiFi (older NamimnoRC Gen1 TX Modules)
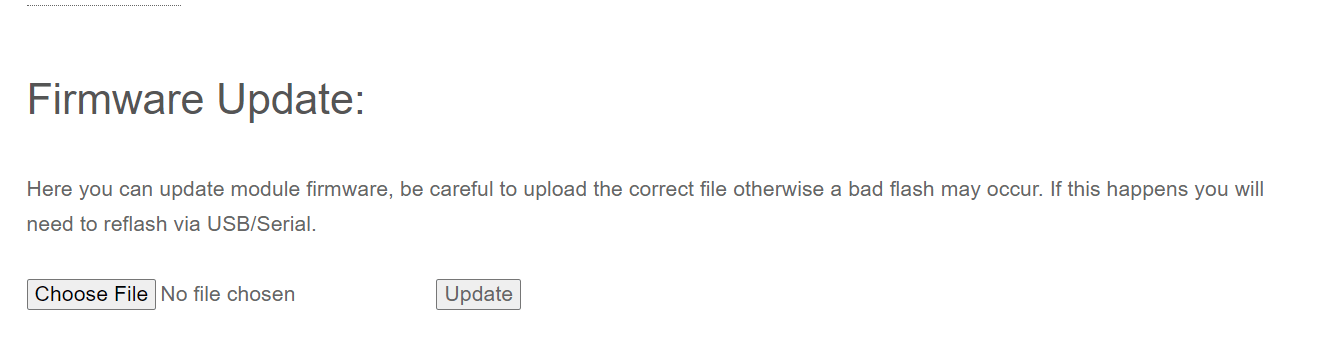
For the First Generation NamimnoRC TX modules (No OLED), you will have to first Build the Backpack firmware. Once built, grab the backpack.bin file from the folder that the ExpressLRS Configurator opened. Open the URL http://elrs_tx.local on your browser and scroll down to where the WiFi Backpack Firmware Update section is (shown in the image below). If the page isn't loading, make sure you have followed the Wifi Flashing guide for these modules (see Flashing Guide).
Wait for a bit (~10s) after the message "Update Success! Rebooting..." appears before you power-cycle the module. Your TX Backpack should now be ready.
Flashing via ETX Passthrough
Applies to: Internal ExpressLRS TX modules, e.g. RadioMaster Zorro TX Backpack, RadioMaster TX16S Backpack, etc.
FYI
This method is the result of the collaborative effort between EdgeTX, RadioMaster, and ExpressLRS.
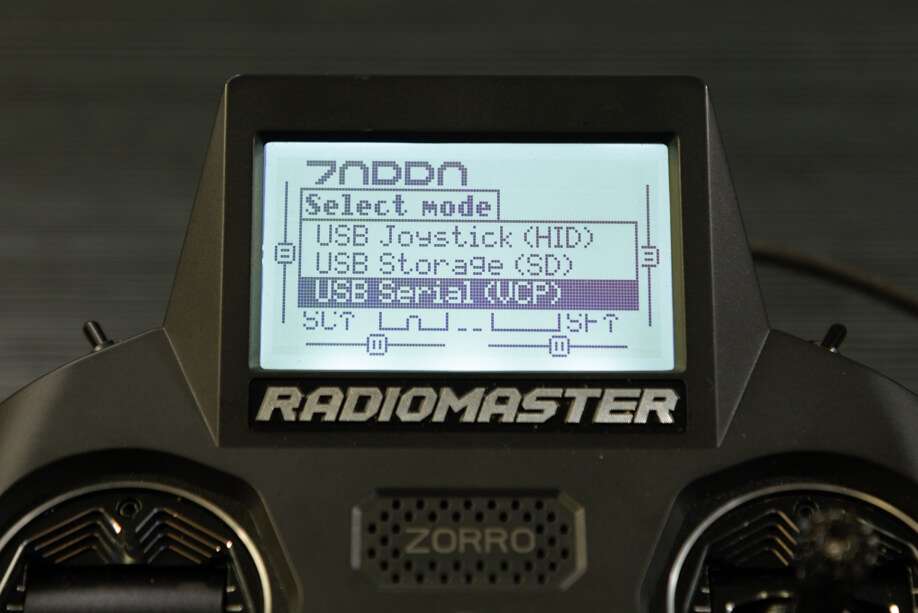
- With your handset turned on, connect a USB data cable to the USB data port of the Radio.
- Select
USB Serial(Debug)orUSB Serial(VCP)in the options window that pops up.

- In the Configurator, select the
EdgeTXPassthroughoption underFlashing Method. - Ensure you have completed the steps in the Setup section above, then click
Flashon the ExpressLRS Configurator. - Wait for the process to complete and you should see the green
Successnotification. - Unplug the USB from the handset and you're set!
How to check you have updated the TX Backpack Firmware?
Make sure you set the jumpers or DIP switches on your modules (if required, e.g. the Happymodel TX Modules) to the Normal Operation position (refer to the top of this page). This allows the main ESP32 chip to talk to the Backpack chip. The Backpack will NOT work properly if the DIP switches or jumper pins are not in the Normal Operation position.
Attention
Change the position of the DIP switches or jumper pins to Normal Operation if required for your module (e.g. Happymodel TX modules).
Navigate to the WiFi Connectivity folder of the ExpressLRS Lua script and select Enable Backpack WiFi. Scan for Access Points, and ExpressLRS TX Backpack should appear. Connect to it and point your browser to http://10.0.0.1/.
If you have set your Home Network SSID and Password, point your browser to http://elrs_txbp.local/.
The main banner will show you what kind of device it is and the firmware version that's flashed into it.
Setup your VRX Backpack
Proceed to the VRX Backpack Setup section to setup your VRX Backpack, if desired.
Operation
The Backpack Usage section provides further details on ExpressLRS Backpack Operation, including Binding, LED Status codes, and more.