Binding ExpressLRS

Compatibility Check
The first number in the Version string should match between a TX Module and a Receiver.
Examples:
- a TX Module with version string of 3.1.2 will sync and work with a Receiver with firmware version 3.0.1
- a TX Module with version string of 3.2.0 will NOT sync or bind with a Receiver with firmware version 2.4.0
- a Receiver with version string of 3.1.2 will sync and work with a TX Module with firmware version 3.0.1
- a Receiver with version string of 3.2.0 will NOT sync or bind with a TX Module with firmware version 2.4.0
- SPI-based Receivers on (official) Betaflight 4.3.1 and older will only sync or bind with ExpressLRS 2.x firmware
- SPI-based Receivers on Betaflight 4.4.0 and newer will only sync or bind with ExpressLRS 3.x firmware
If your firmware versions are incompatible, NONE of the methods below will work.
See these pages on how to check the firmware version on your ExpressLRS devices:
How to Bind ExpressLRS Devices Together
There are TWO methods to Bind/Sync an ExpressLRS TX Module and a Receiver:
If you'll be updating or reflashing your ExpressLRS firmware into your device anyway, using a Binding Phrase is a no-brainer.
With the release of ExpressLRS v3.0, updating your Binding Phrase via the WebUI is an even more compelling reason to use a Binding Phrase.
Below are the different Binding Procedures for ExpressLRS.
Unique Phrase
You can select a short and simple Binding Phrase for your devices before flashing or updating using the field in the ExpressLRS Configurator.
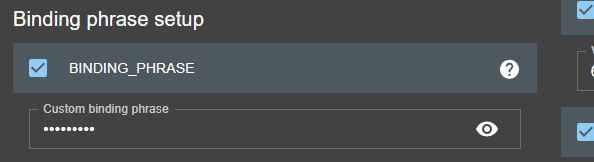
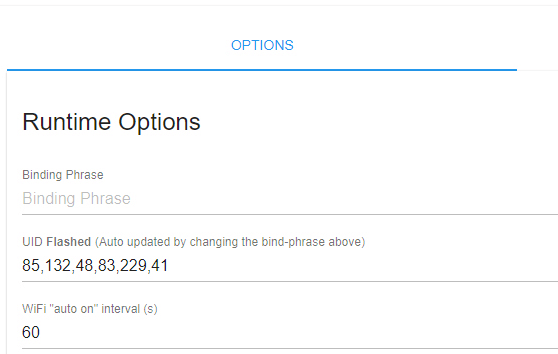
Alternatively, you can also change the Binding Phrase via the WebUI if your device has WiFi capabilities and is already updated to ExpressLRS 3.0 or newer. See this page for the WebUI User's Guide.
We recommend using a unique phrase with at least 8 alpha-numeric characters. The best candidate is your Pilot Handle. This phrase need not be complicated or super-secret as it isn't a password or encryption key.
Is my binding phrase a secret? (click/tap to expand)
No, just like what channel your VTX is on is not a secret. The binding phrase is not for security, it is for anti-collision. If everyone kept their VTX channel a secret, the chances of you blasting someone out of the sky accidentally are pretty high. To provide the best chance of not interfering with other pilots and them not interfering with you, be sure you're not using the same dumb bind phrase as someone else. Express your style and some creativity with a hilarious or saucy bind phrase.
Traditional Binding
For traditional binding to work, a Binding Phrase must not be set, at least for the Receiver.
Updated on 3.4.0
Any Receiver flashed with 3.4.0 or newer can be put into Bind Mode, even with a set Binding UID.
Notice
A Receiver flashed or set with a Binding Phrase WILL NOT initiate Manual Binding mode, however many times you try the procedure below. You must first reflash the receiver with the Binding Phrase field disabled and/or unset. Why would you not use a bind phrase though if you're already having to flash the RX anyway? 
The Receiver LED should also be blinking when powered up.

Receiver LED doesn't Blink (click/tap to expand)
Here are the things you can do if the Receiver is in Bootloader Mode:
-
Check if the Boot button on the Receiver is being pressed or if it's damaged.
- If the button is being pressed or pinched, remove the cause of the pressing or pinching. Heatshrink can sometimes press a button on the receiver.
- If the button is damaged, remove the button or replace the receiver with a better one. Consider asking the seller for a replacement.
-
If the receiver doesn't have a Boot button and instead has a Boot pad, check if the Boot pad is not connected to a Ground pad.
- If the Boot pad is connected to a Ground pad, disconnect or remove the connection.
-
Disconnect the RX and TX wires of the Receiver from the Flight Controller. Reconnect power to the drone or aircraft. Observe the LED on the Receiver once again.
- If it starts Blinking Slowly (500ms Blink Pattern), you will need to move the receiver wiring to a different UART.
- If the other UART is occupied by another peripheral, disconnect it and swap places with the Receiver.
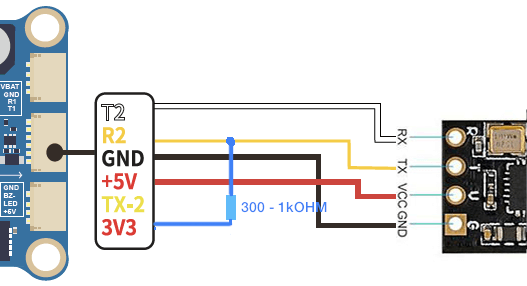
- If there is no other Full UART, you can try wiring a Pull-up Resistor: Connect a Resistor (300 Ohm to 1k Ohm value; a lower value is more effective) between this UART's RX pad and either a 5v or 3.3v pad as shown below:
-
If you are using any of the Digital FPV systems like the DJI FPV Air Unit, Caddx Vista or DJI O3 Air Unit, and you wired or connected all six wires to your Flight Controller, you will need to remove the SBUS/DJI HDL wire.
The procedure is as follows:
- Power off your transmitter/radio.
-
Power-cycle the receiver 3 times.
- Supply power to the receiver.
- The receiver LED lights up.
- Turn it off within 2 seconds.
- Repeat 2 more times.
Caution
This step is best done using a LiPo flight pack, so make sure you've wired your flight controller properly and checked for any shorts. You don't want to let out the blue smoke!
-
Make sure the LED is doing a quick double-blink, which indicates the receiver is in bind mode.

-
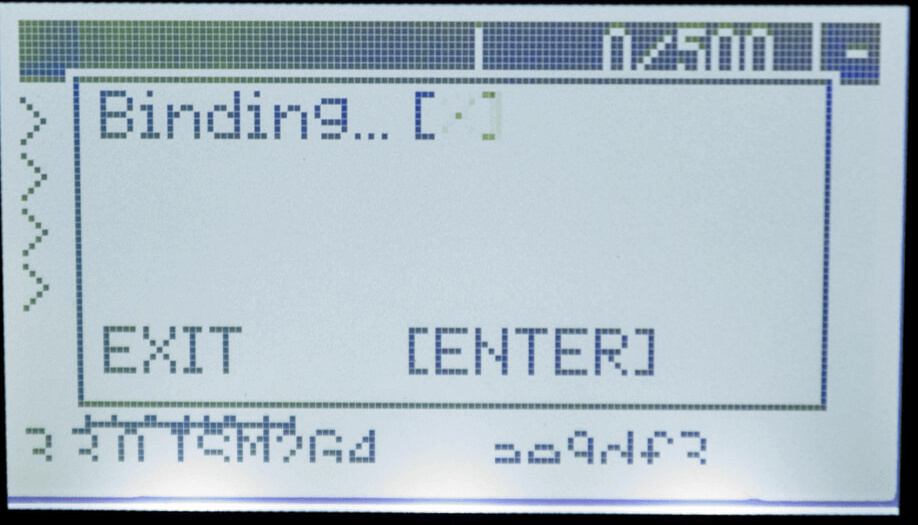
Power up your transmitter/radio and use the [BIND] button on the ExpressLRS Lua script, which sends out a binding pulse. The Popup will briefly show up and then disappear.
-
If the receiver LED turned into a solid light, it's bound!

Updated Binding Procedure since ExpressLRS 3.4.0
With PR#2542 being part of the 3.4.0 update, users now have the following methods to bind an ExpressLRS receiver with a TX module:
- Binding Phrase, flashed or set (via the WebUI) into both devices.
- 3x Power Cycle.
Bind Receiverbutton in Betaflight Configurator 10.10 (or newer) Receiver Tab (bind_rxCLI command also works). This will ONLY work if your flight controller is flashed with Betaflight 4.5.0 or newer.- 1.5s Button Press on the Receiver itself (or Boot pad shorting to Ground).
With the last 3 methods, the Receiver LED will blink twice, pause then repeats, until the Bind is established indicated by a solid LED light. Pressing [Bind] in the ExpressLRS Lua Script should establish the Bind, per the Traditional Binding Procedure above.
After a Receiver is bound using any of the methods above, users can put the Receiver back into Bind Mode anytime following any of the last 3 methods above. The Bind will persist or stay with the receiver until another Binding Procedure is initiated, with any of the methods above.
To cancel Bind Mode, a reboot or power-cycle is needed, or Binding the receiver with a Transmitter. The old Binding Info will be used if the receiver is rebooted without the new Bind.
A Lua Script or WebUI option can be toggled to make the Bind volatile upon power-cycle or reboot. Volatile Bind means that the Bind is only valid while the receiver is powered up. Once the receiver is power-cycled or rebooted, the Bind information is wiped and the receiver will boot up in Bind Mode.
Connection Check
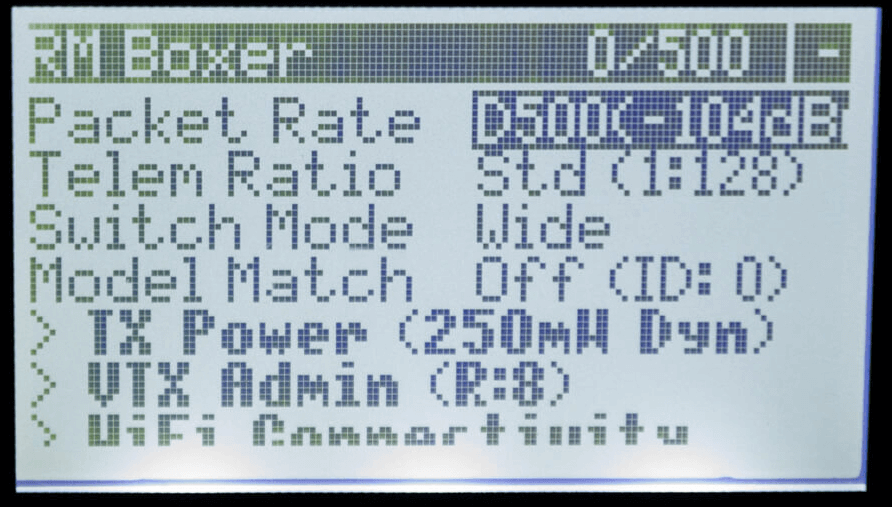
Using the ExpressLRS Lua Script, look for a C in the top-right corner of the screen which indicates TX module and Receiver are Connected and Communicating.
-
Press the SYS Key on your Radio.
- Older Radios or those with only one Menu Key will need to long-press the Menu Key to access the System Menu.
- Consult your Radio User's Manual on how to access the System Menu.
-
You are now in the Tools Menu where Lua Scripts can be found. Scroll down and select
ExpressLRSLua Script.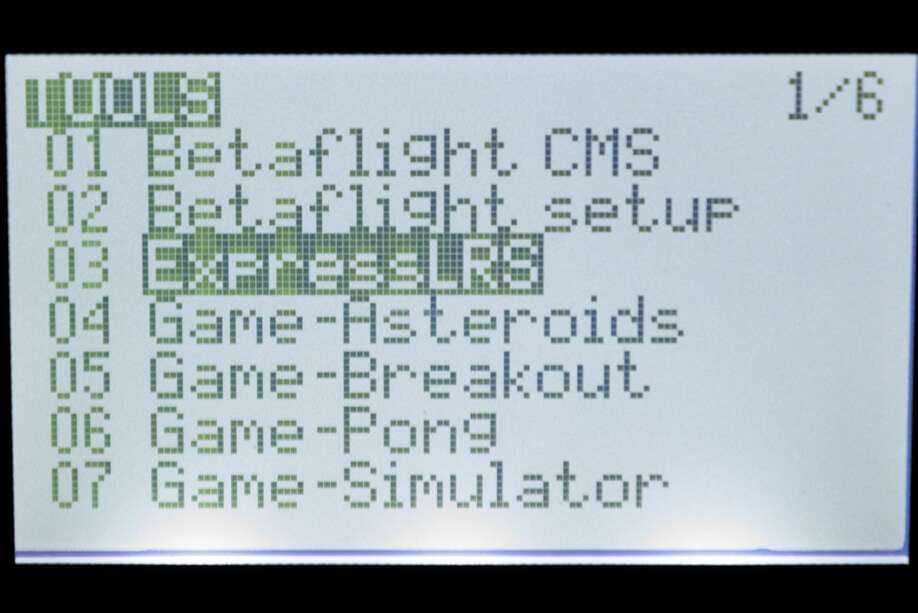
- If the script is nowhere to be found, download it from this page and save it into your Radio SD Card Scripts/Tools/ folder.
-
Press Enter to Load it.
- If the script is stuck on a "Loading..." screen, go back to the Radio Preparation Page and make sure you have configured your radio properly for ExpressLRS use.
-
A
Cin the top-right corner should be visible indicating TX module and Receiver are connected and Communicating.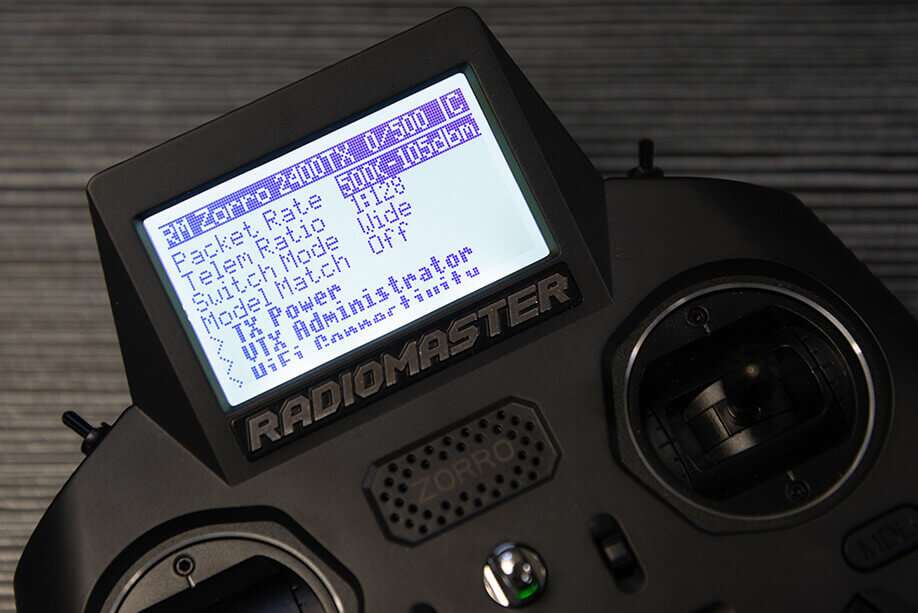
Model Mismatch (click/tap to expand)
If the ExpressLRS Lua Script is showing a C in the top-right corner alright, but then that line disappears and is replaced with a line saying "Model Mismatch", do not worry. ExpressLRS has detected that the set Model ID in the Receiver is different from the Receiver ID set in the current Model in your Radio Model Configuration.
This is also indicated by the Receiver LED as 3 fast blinks then a pause:

If you've deliberately set up Model Matching following this page, make sure your settings are correct.
If the Model Match item in the ExpressLRS Lua is set to On, and you do want to use the Model Matching Feature, briefly set it to Off, then set it back to On to assign the current Receiver and Model ID to the Receiver.
Otherwise, simply set the Model Match item to Off.
If Model Match is set to Off, briefly set it to On and after a second or so, set it back to Off. This should clear the Model Match ID in the receiver.
This must be done while the TX module and Receiver are both powered up and connected/bound.