Before First Flight

Prior to your first ExpressLRS flight, you may want to do a few tweaks to your setup to ensure a fun and trouble-free ExpressLRS experience!
Modes
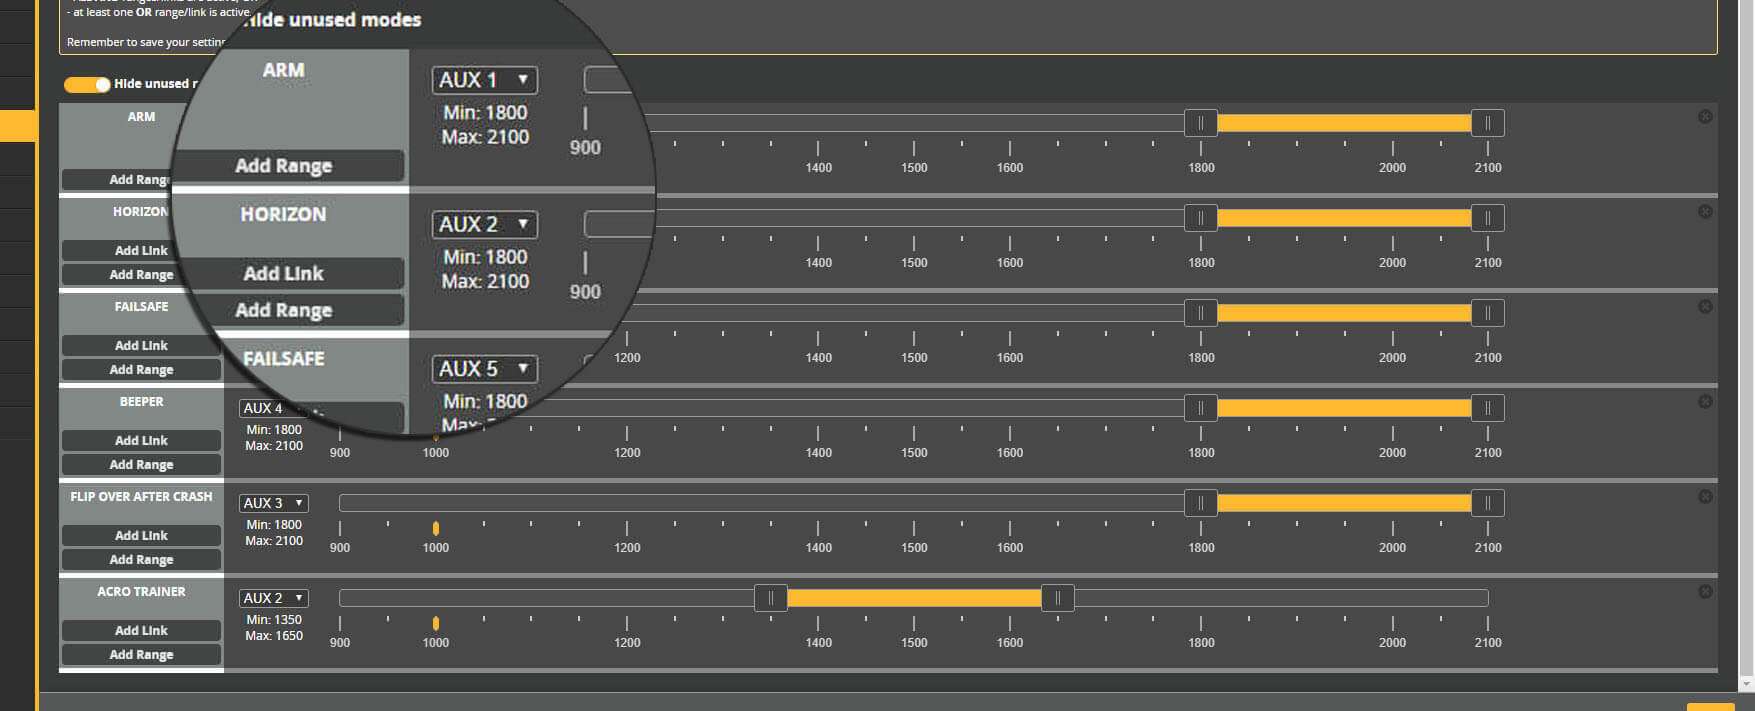
By default, ExpressLRS uses limited bits for AUX switches (1-bit for AUX1, and 3-4 bits for other AUX channels), which results in very coarse resolutions up to 8 or 16 positions to Betaflight/INAV on the AUX channels. In most cases, it is enough (especially on a multirotor), but if you need finer resolution, enabling the Wide Switch Mode option expands the resolution of AUX2-AUX8 up to 128 positions. For more information, read the switch modes page.
One important thing to keep in mind is that Aux1 should be used as your Arming switch, with LOW (~1000us) as disarmed and HIGH (~2000us) as armed. AUX1 is the low-latency switch, sent with every packet, and only supports on/off (2-position) operation. ExpressLRS uses AUX1 to determine if your model is armed and this is the most reliable way to be able to tell your model to disarm. If your arm switch is in another aux channel, it may be several packets before that switch is transmitted, and there's no guarantee that the Receiver will receive that packet.
WARNING
Please make sure your ARM mode is on the AUX1 channel, and the armed state is set ~2000.
RSSI and Link Quality
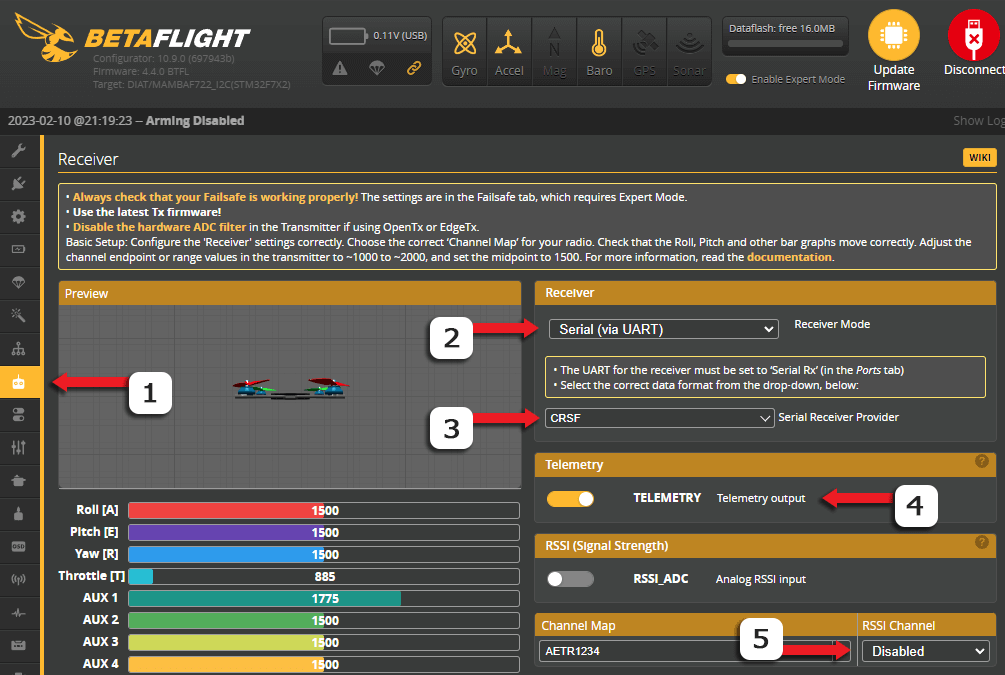
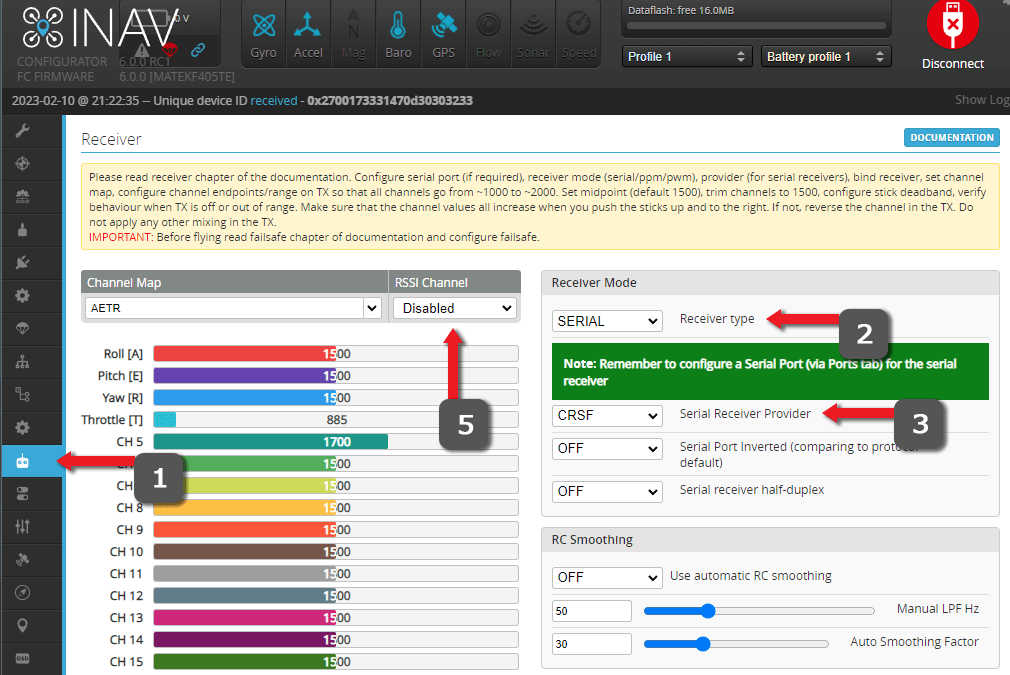
To get RSSI and Link Quality displayed in the OSD, set both RSSI Channel and RSSI_ADC to Disabled. Both settings can be found in the Receiver Tab.
On the OSD Tab, use the Link Quality and RSSI dBm value elements (not "RSSI Value"). INAV has put this in the CRSF RX Statistics section.

If you wish to enable the RSSI dBm warning, you'll have to change the alarm level using set osd_rssi_dbm_alarm = -100 in CLI. A sensible value is 5-10 higher than the sensitivity shown in the ELRS.lua for the packet rate (e.g. 250Hz=-108, so -103 to -98 for the alarm).
Likewise, if you want to change the LQ Alarm level, you can use the CLI command set osd_link_quality_alarm = x with x as your LQ Alarm level. 60 is a good value to start with.
If you're using DJI Goggles V1 or V2 (unrooted/unmodded), you're required to use "RSSI Value" as the OSD element. Therefore you have to decide between LQ or RSSI, by selecting either AUX11 (LQ) or AUX12 (RSSI) as RSSI Channel on the Receiver tab (see images above).
For digital FPV systems with "Canvas Mode" or full native OSD support via MSP DisplayPort (Walksnail Avatar, HDZero, DJI O3), you can treat the config as any analog FPV setup. Therefore, you do NOT have to set RSSI Channel (leave it at disabled).
More information about signal metrics can be found in this great article on signal health.
Bench Test
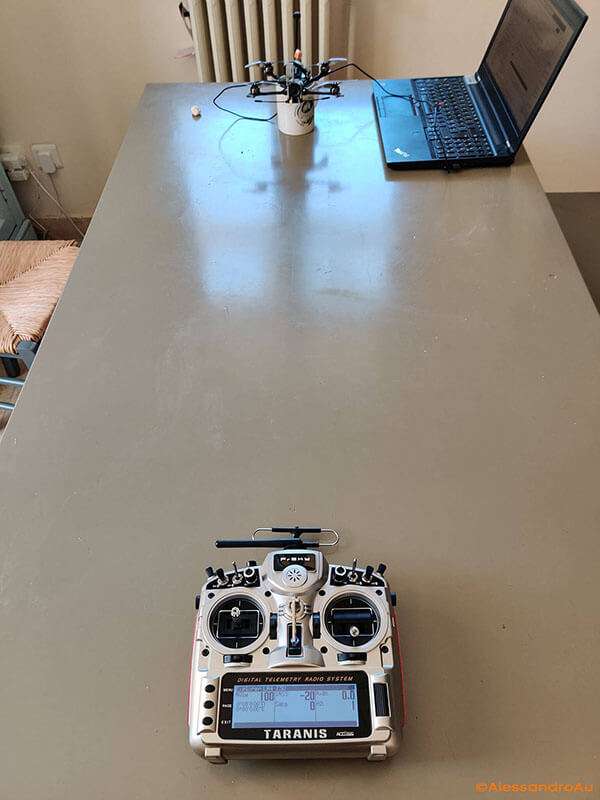
Shown above is a Bench Test to determine if you're getting a good signal from your radio. This aims to provide you with information on whether you should check your antennas (particularly the R9's Super 8) or if you have good hardware overall.
- Set your ExpressLRS module to the lowest power level using the Lua script. The packet rate doesn't matter much here.
- Put your radio 1m (3ft) from your receiver and power it up. Make sure the receiver and TX module antennas are oriented in the same way. (You might want to disconnect your VTX/Air Unit temporarily, put VTX in pit mode, or have a fan blowing on it).
- Using your OSD or the Telemetry Page of your radio, take note of the RSSI dBm or the 1RSS telemetry data.
On the 900MHz hardware, a value of -20dBm or thereabouts is a good indication your hardware is in working order. On the 2.4GHz hardware, around -40dBm up to -25dBm should be good. If you're getting lower numbers than these (closer to 0 is higher and better), here are a few things you could check:
- The ExpressLRS module antenna could be loose. On some 3D printed module cases, the print may be too thick at the part where the pigtail's RP-SMA/SMA end would be attached; if so, tighten the nut on the RP-SMA/SMA to give the antenna some more space to get tightened up.
- The antenna pigtail may be damaged or not connected properly to the module's mainboard.
- On receivers using SMD antennas, expect lower values than those equipped with wire antennas. If the receiver with the SMD antenna has heat shrink, enclosed in a whoop canopy, surrounded with carbon parts or buried inside a plane/fixed wing, expect some more attenuation of the signal.
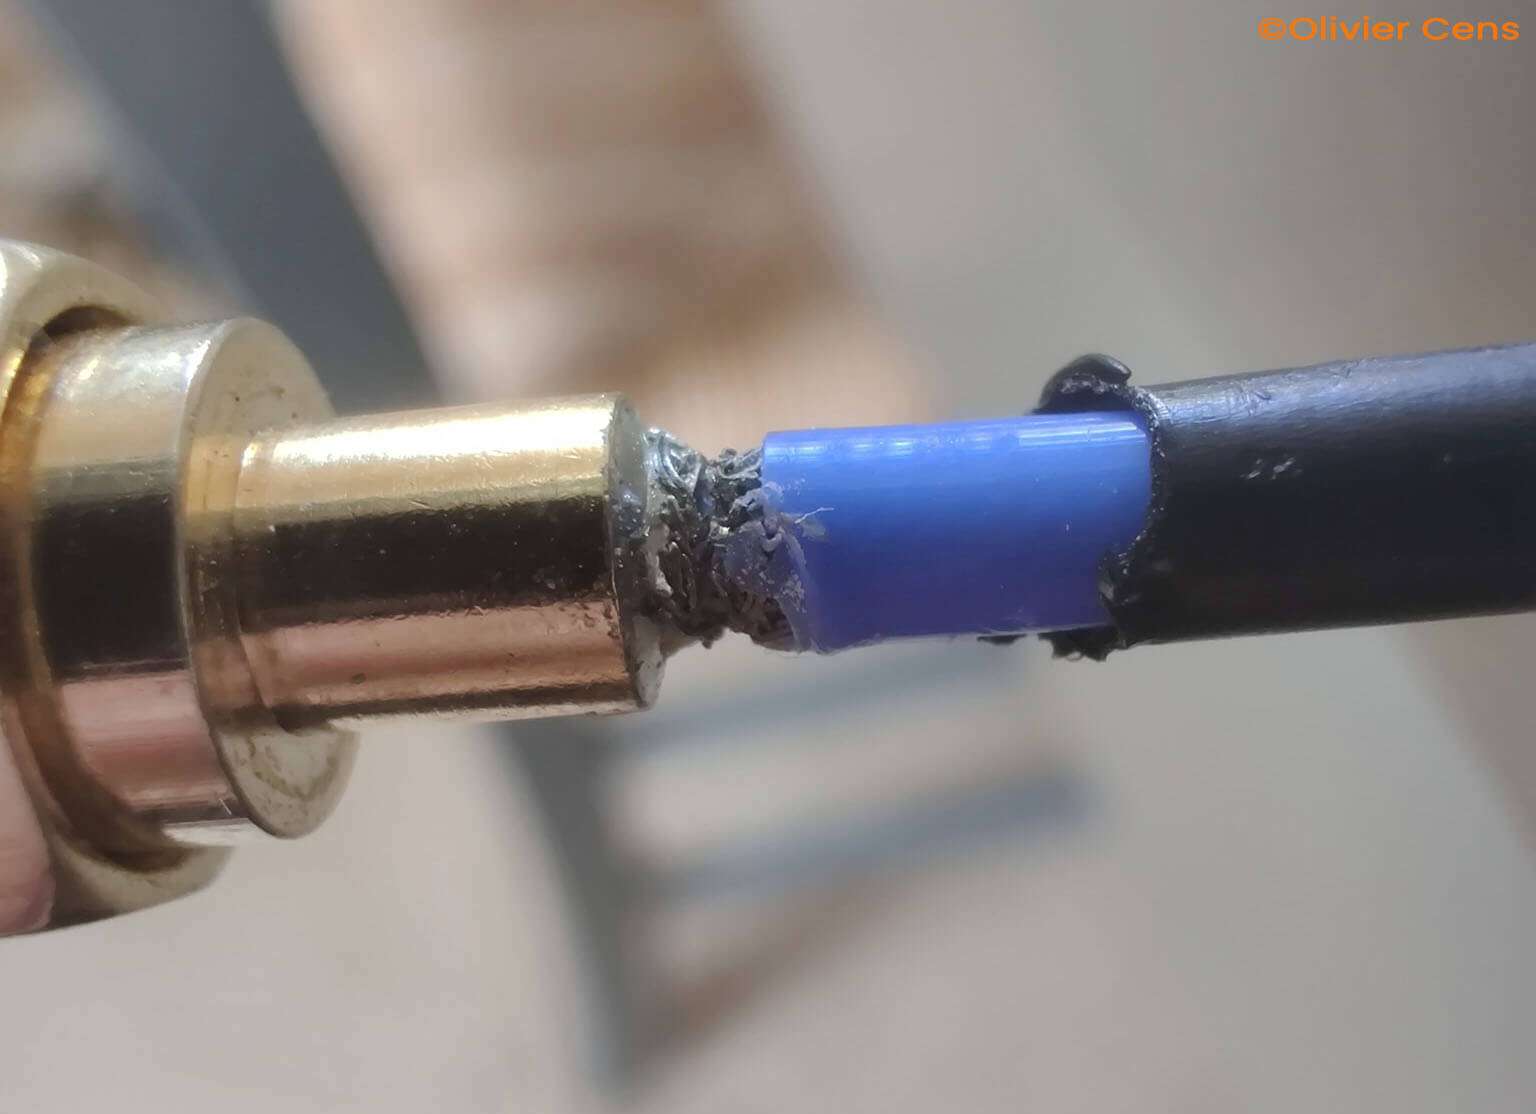
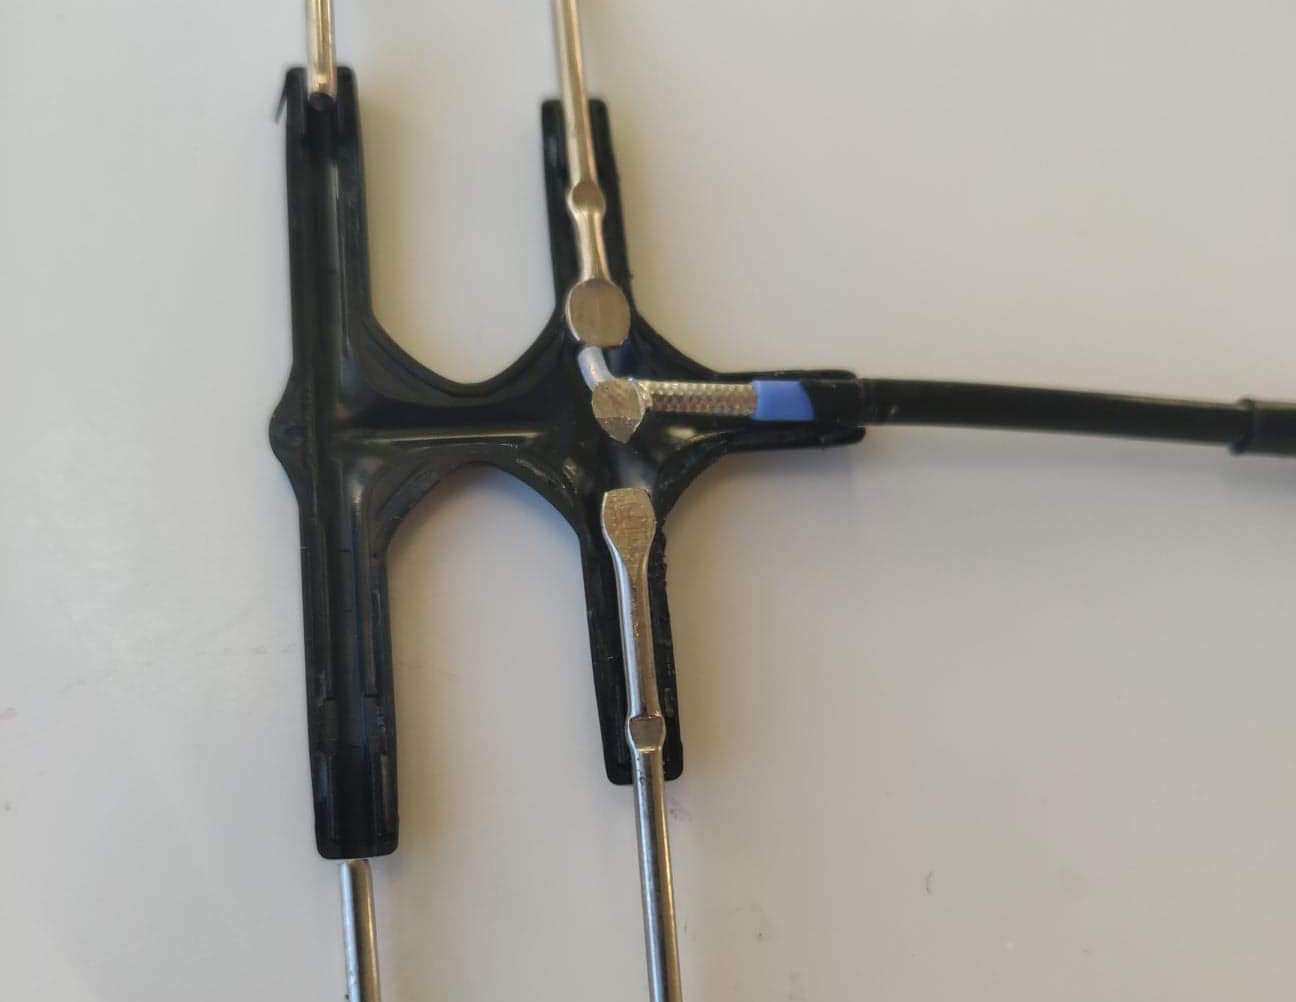
- The Super 8 antenna from FrSky, which most of the R9Ms came with is notorious for being faulty or would degrade from just a few weeks of use. Replace it or as a temporary fix, solder all around the junction where the coax shielding and the RP-SMA meet. Another failure point is the connection of the coax to the active elements itself. It would seem okay, but due to the twisting of the antenna, the connection could be severed.
- Check if there aren't any missing components in your receivers, like the RF filter (can be found near the antenna or UFL). Also check if the SMD antenna is not broken or damaged and it's soldered in properly.
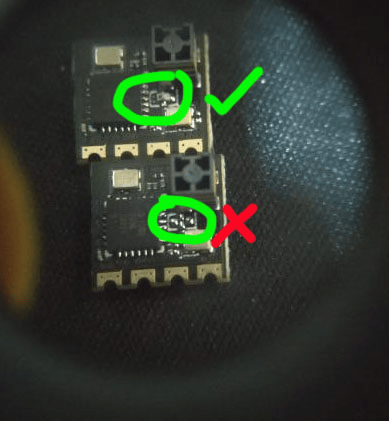
- Most DIY modules require moving the 0-ohm resistor on the E28 from the PCB antenna side towards the UFL side. A solder bridge will work just fine as well, but make sure it is on the correct pads.
- Swap out antennas on the receiver and/or the TX module; Most ExpressLRS receiver antennas use IPEX 1/UFL connectors and as long as the frequency tuning of the antenna is appropriate for the frequency you're in, it should work. You can also use old 2.4GHz WiFi Router antennas for your 2.4GHz modules, but avoid those that are dual-band. Also, make sure that the connector on the antenna is the appropriate one (RP-SMA on R9 modules; SMA on most off-the-shelf ExpressLRS modules)
RC Link Preset (BETAFLIGHT ONLY)
For flight controllers based on Betaflight, there are 'RC Link Presets' available that configure feedforward smoothing and associated link settings based on your packet rate and usage case.
Warning
Using no link preset, or using the incorrect one for your packet rate, can result in unwanted noise and jitter in feedforward, which can affect setpoint tracking and thus flight characteristics.
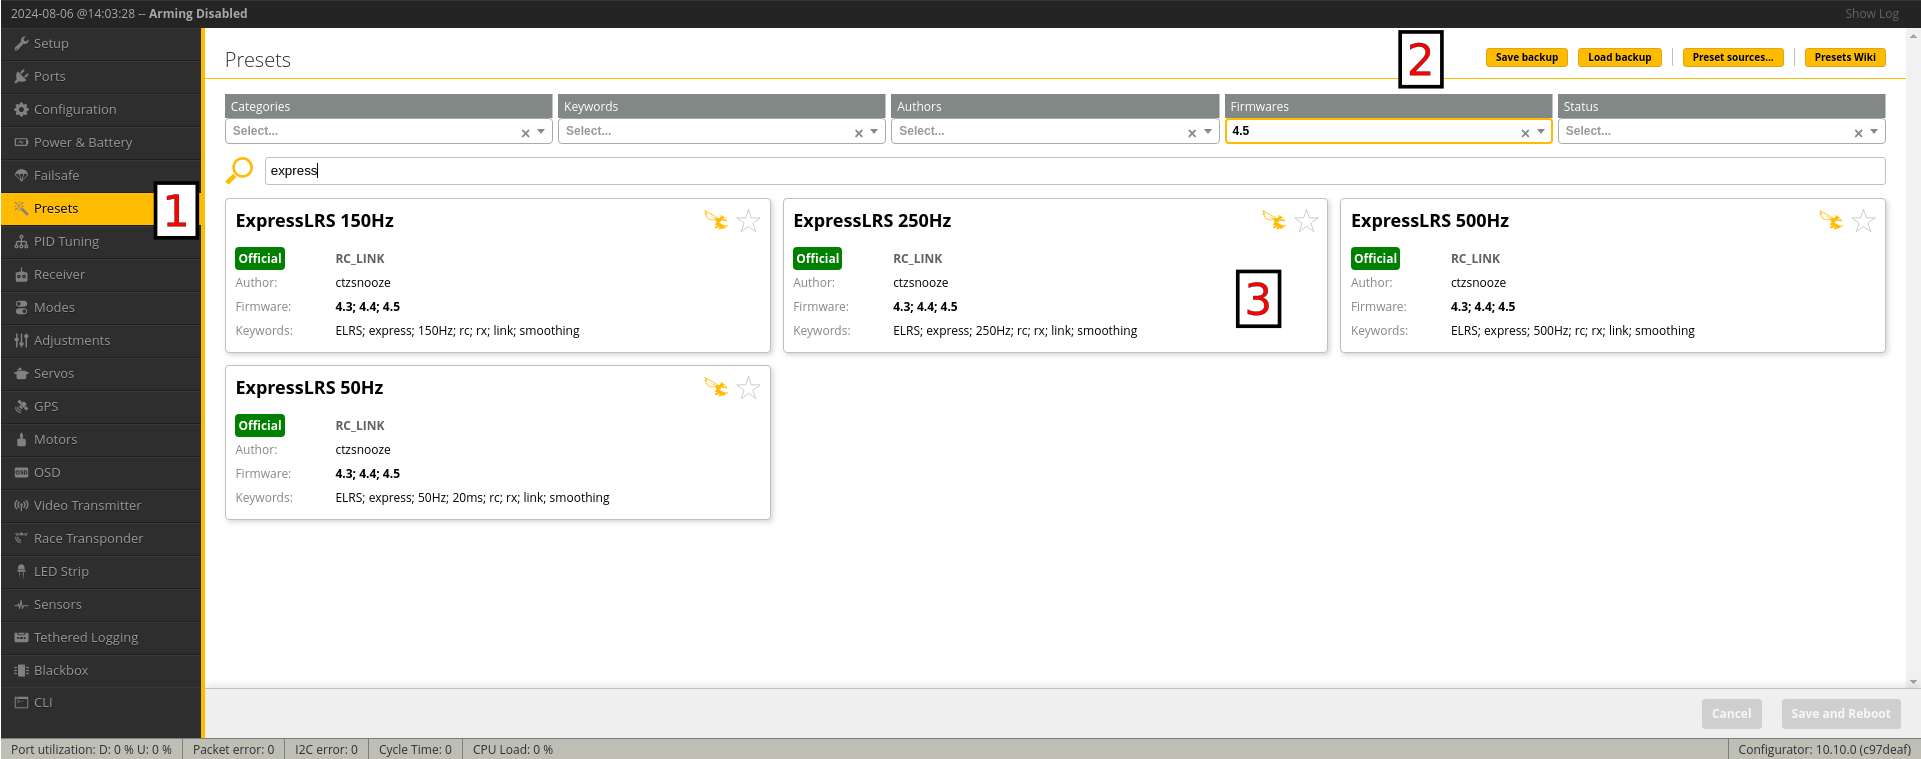
To install the correct 'RC Link Preset', follow these steps in Betaflight Configurator:
- Select the Preset tab
- In the preset tab, select Save Backup and save a backup to a safe location before applying any preset.
-
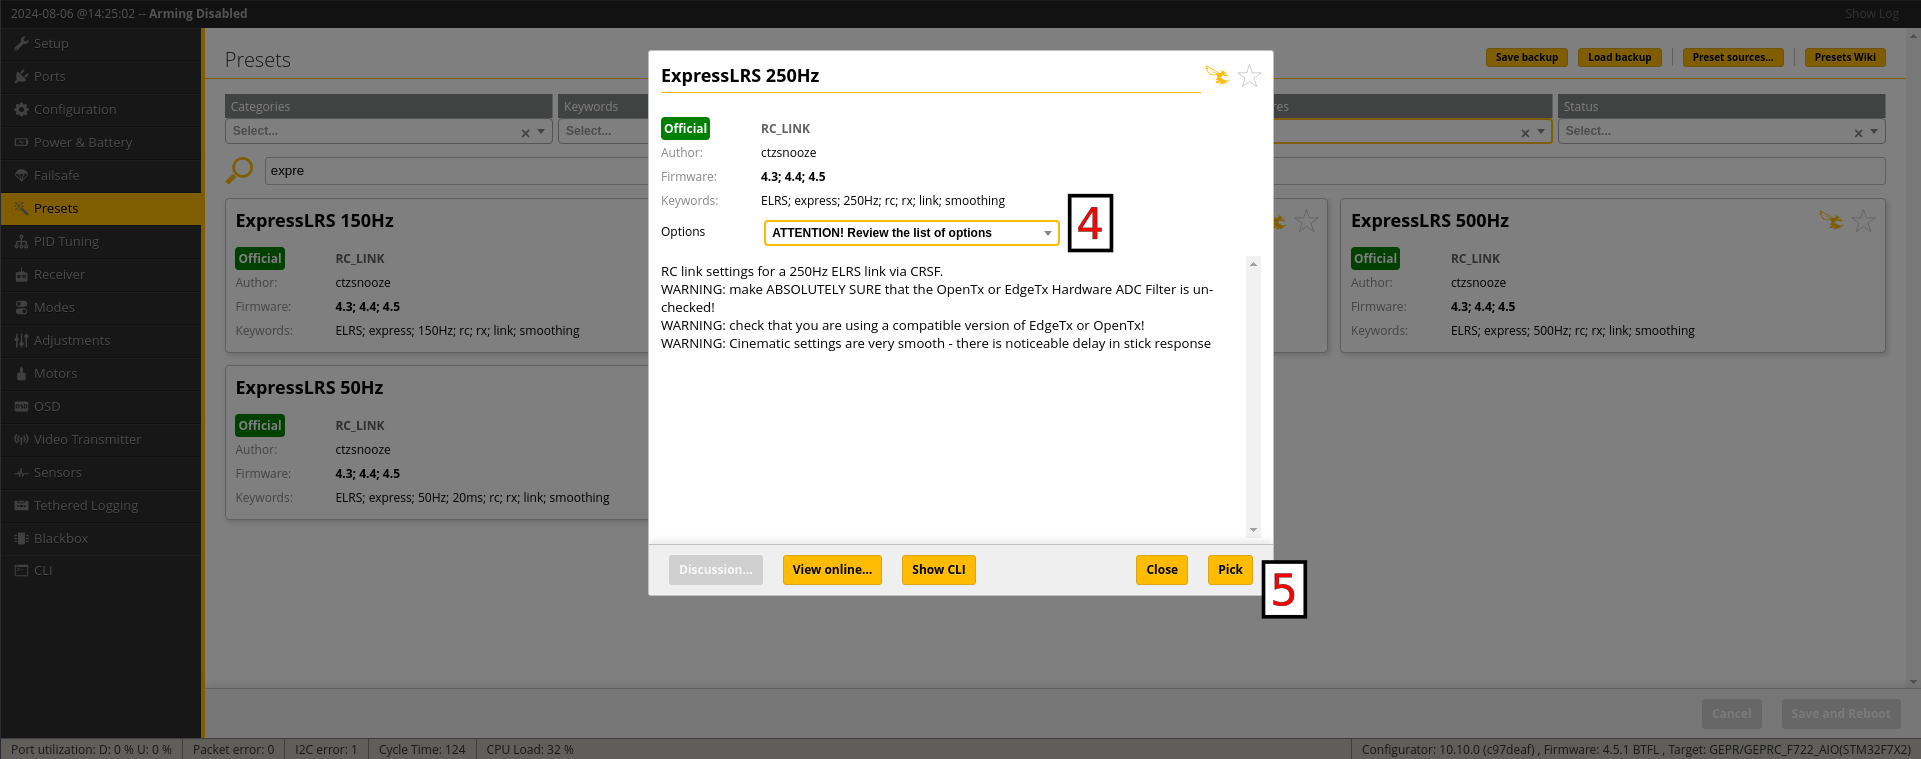
Search for 'ExpressLRS' and select the Link Preset that matches your Packet Rate. If no direct match is available, choose the closest preset below your packet rate.
-
Read through the options by selecting the dropdown list. NOTE: These are all optional, if none of them apply to your circumstances, it is OK to leave everything unticked.
-
Select 'Pick' to stage the preset:
-
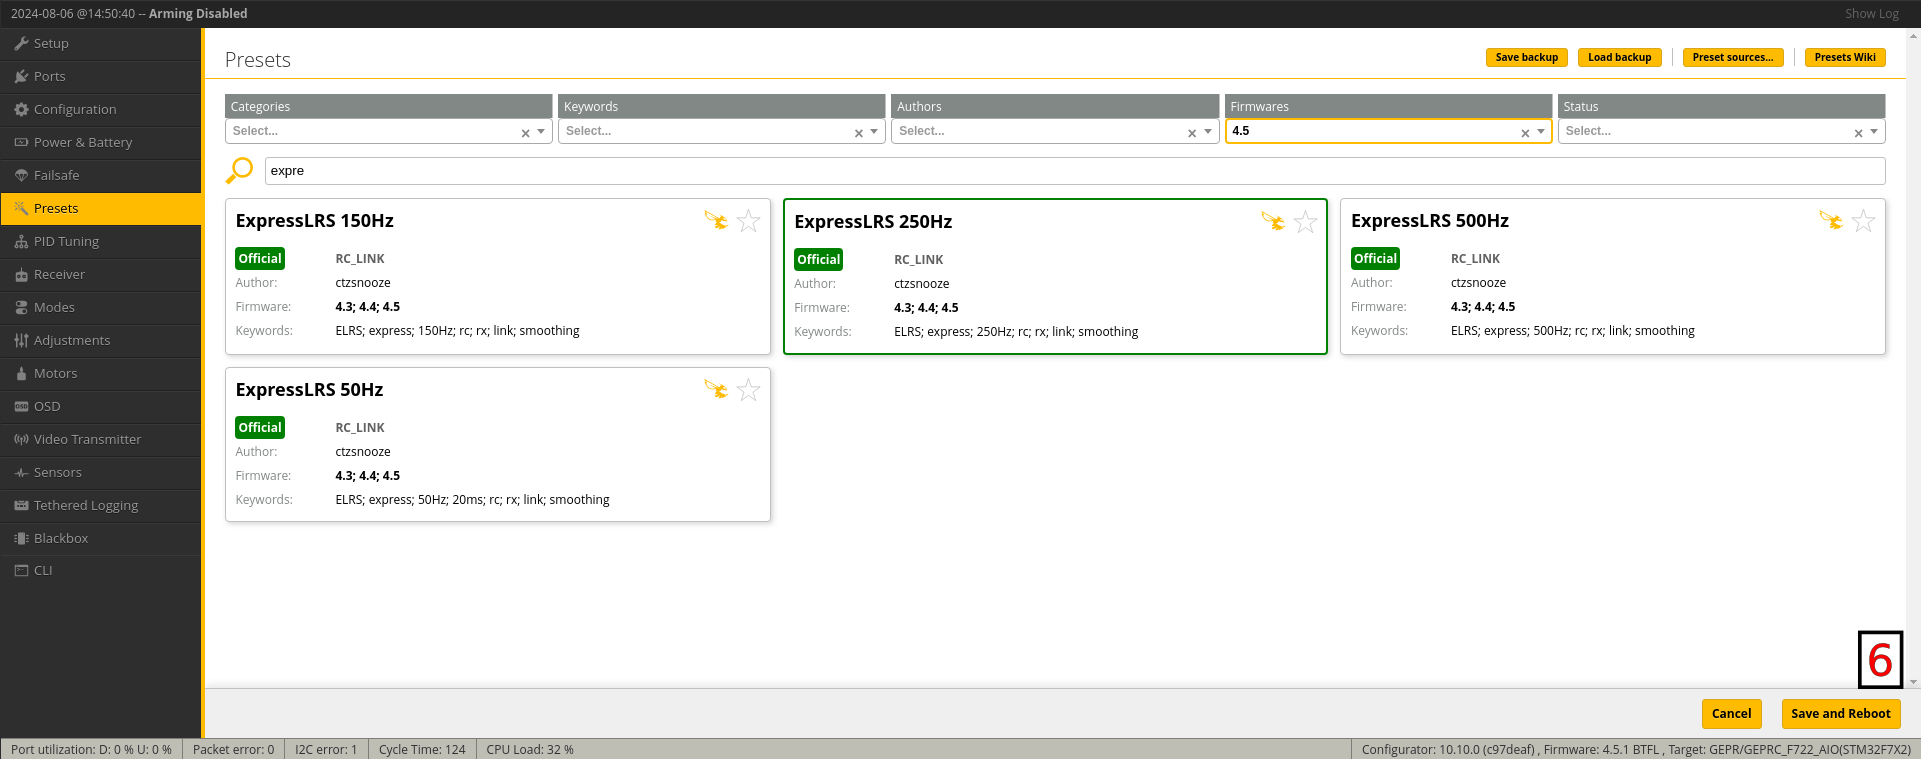
Select Save and Reboot to apply the preset:
Blackbox
Blackbox is handy for evaluating the performance of the RF link for a flight. Set your BB to debug mode RC_SMOOTHING_RATE, which will capture the rate that Betaflight is receiving RC Packets from the RX.
Telemetry
The RX transmits a subset of telemetry it receives from the flight controller. Disabling certain messages only works if the flight controller firmware does support it. For Betaflight this is possible with the telemetry_disabled_* CLI settings:
# Disable Attitude telemetry item
set telemetry_disabled_pitch = ON
set telemetry_disabled_roll = ON
set telemetry_disabled_heading = ON
# Disable Battery telemetry item
set telemetry_disabled_voltage = ON
set telemetry_disabled_current = ON
set telemetry_disabled_fuel = ON
# Disable GPS telemetry item
set telemetry_disabled_altitude = ON
set telemetry_disabled_lat_long = ON
set telemetry_disabled_ground_speed = ON
set telemetry_disabled_heading = ON
# Disable Flight Mode telemetry item (BF >4.2.9)
set telemetry_disabled_mode = ON
Since telemetry messages are sent with low priority it may take some time to transmit the data. The telemetry rate in the Lua settings script controls how often a telemetry message should be sent. So a ratio of 1:2 means that every second message is a telemetry message, so the telemetry data is transferred very fast. A ratio of 1:64 means that only one of 64 messages is a telemetry message and so the transfer happens much slower.
The refresh rate also impacts the transfer speed. 50 Hz is slower compared to 200 Hz. So if you need a fast telemetry update rate choose a high refresh rate, and a ratio that favors telemetry messages e.g. 200 Hz and 1:16 usually works well. For detailed information on telemetry bandwidth at different rates and ratios, see this page on telemetry bandwidth.
To finish the telemetry setup open the telemetry page on your transmitter and select "Discover new sensors" and wait for the list to fill.
* Indication
Notice, that there is a * sign for each row. This star indicates that this telemetry sensor was just updated.
[ ] Indication
If you see a row that does not change, and the name of the row is in square brackets it means that this sensor was not updated for some time.
The first values (including RSSI and link quality) should always be updated (flashing stars). If this does not happen multiple times per second the transmitter will issue a "telemetry warning". To prevent this warning use the setting TLM_REPORT_INTERVAL_MS.
It should look like this (and if it does not there is something wrong with your setup):

The remaining values are updated at a different rate (depending on refresh rate and telemetry ratio). So if you use 50 Hz and 1:64 it will happen slowly, and the update takes multiple seconds for each sensor:

If you use 200Hz and 1:2 Tlm ratio the stars will not even blink because the update happens so fast:

MSP
To configure Betaflight from your transmitter it's possible to use the Betaflight lua scripts. If you are having trouble, make sure you are running the latest Betaflight nightly lua. This requires the telemetry feature enabled for the RX+TX. If the telemetry page of your radio does not show regular updates for all sensors the LUA script will not work.
To get a responsive UI, configure ExpressLRS for fast data transfer. Use something like 200Hz/500Hz with 1:2 Tlm ratio and a serial baud rate of at least 400000. The initial VTX tables download does take some time - but is cached after that.
If you get a "retrying" message while saving changes it means that the Lua script did not receive a response fast enough. But the change usually still goes through so try reloading the page to check if the change was saved. With the recommended settings this does not happen but with slower settings, it could happen.
MAVLINK
See the MAVLink setup guide for more info.
Done. Go Fly!