The ExpressLRS Lua Script

Installing the Lua Script
Download the ExpressLRS Lua Script (you can simply right-click, save-as) into your radio's SD Card under the Scripts/Tools folder.
ExpressLRS 4.0
Starting with ExpressLRS 4.0, the ExpressLRS Lua Script will once again go back to just using elrs.lua and will no longer be tied to a specific firmware version.
Running the Lua Script
Access the script by navigating to your radio's System Menu.
EdgeTX 3.0 Update
EdgeTX 3.0 will bring changes into how colored-screen radios are navigated. Please refer to EdgeTX user manual for these changes.
- Press the SYS Key on your Radio.
- Older Radios or those with only one Menu Key will need to long-press the Menu Key to access the System Menu.
- Consult your Radio User's Manual on how to access the System Menu.
-
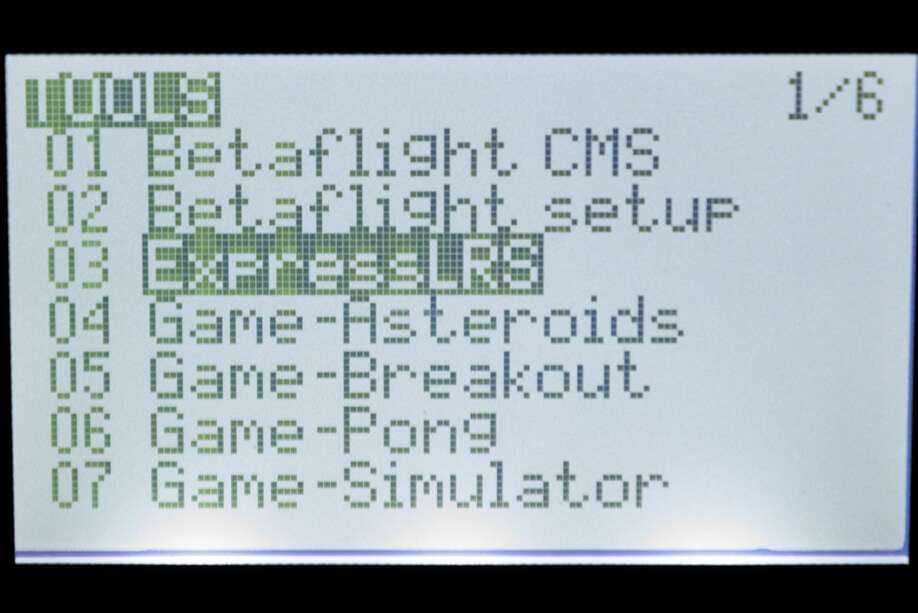
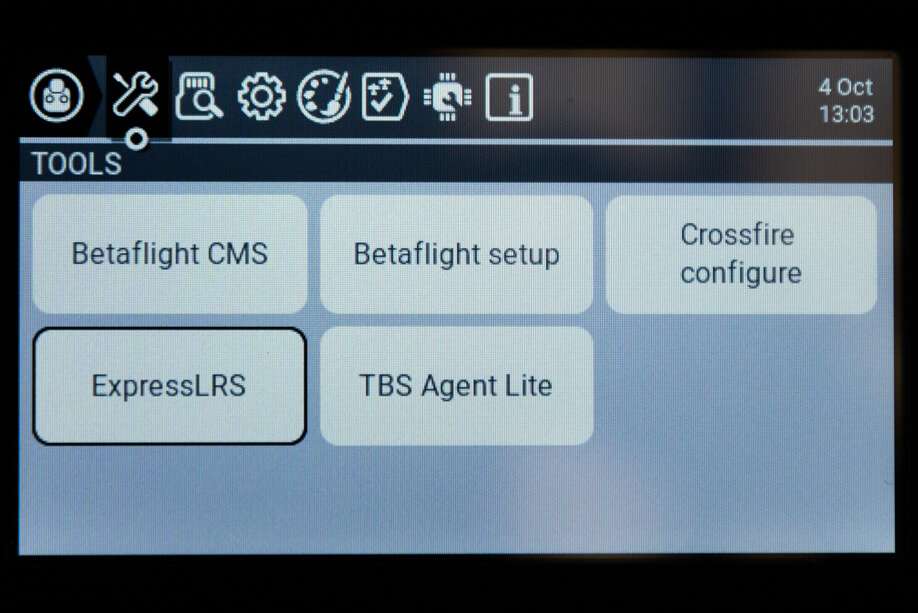
You are now in the Tools Menu where Lua Scripts can be found. Scroll down and select
ExpressLRSLua Script.Here's how it looks in the Tools menu (B&W and Color Screens):
-
Press Enter to Load it.
Stuck at Loading... (click/tap to expand)
Go back to the Radio Preparation Guide and make sure the current model is configured for ExpressLRS use.
Also set your Internal or External RF Baudrate to a higher value if the Script still doesn't load after proper configuration of your Model.
As of 3.3.0:
- 333Hz or faster packet rates require >400K Baudrate for external ELRS modules.
- 250Hz is the fastest packet rate you can use with 400K Baudrate on external modules.
- Best to stick to the fastest baudrate your radio can handle. See the Baud Rate table.
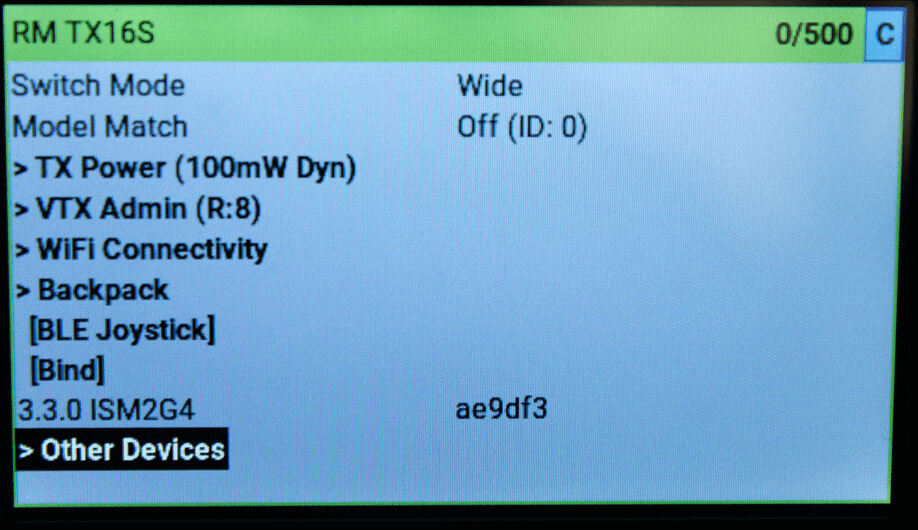
Understanding and Using the Lua Script
The Header
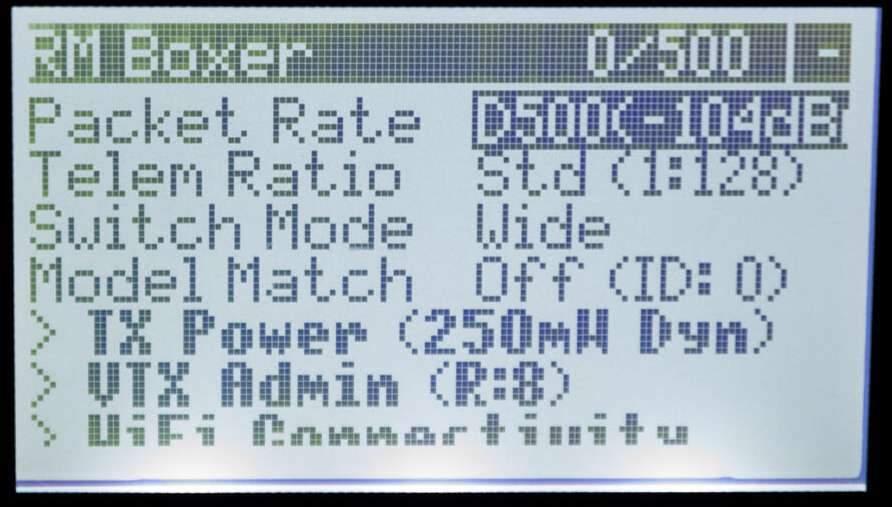
The first line, "Header", will show you some information about your ExpressLRS link.
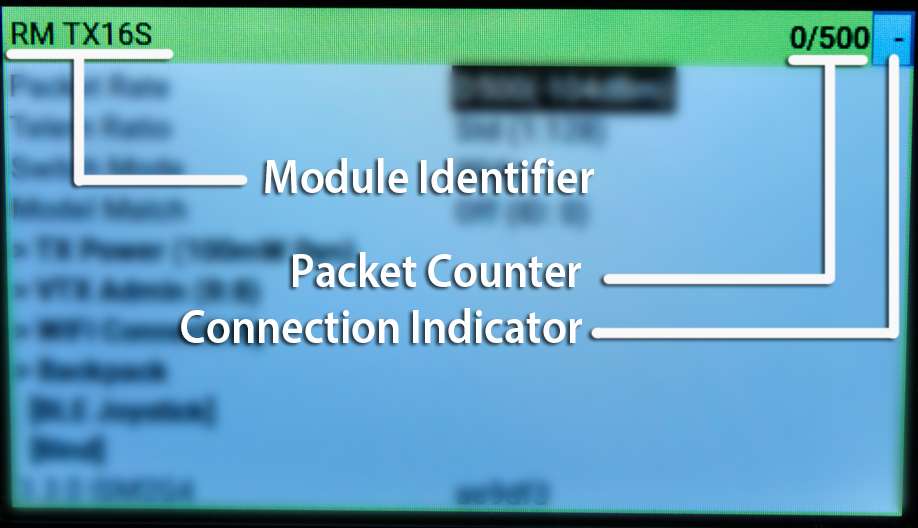
- Module Identifier
-
Shows the name of the current active Transmitter Module or Device.
- Packet Counter
-
Shows the number of Bad and Good Packets the TX Module receives from the Radio. The second set of number should match your selected Packet Rate. e.g. If you've set your Packet Rate to 500Hz, the Packet Counter should show 0/500, which means you're not getting any Bad Packets ( 0 Bad Packets ) and only getting Good Packets ( 500 Good Packets ). Any small fluctuation is normal and often goes back to 100% Good Packets, especially when you change a setting and it's committed into memory.
-
Should the indicator starts showing Bad Packets, and Good Packets goes down, it isn't a good situation. Make sure your module is not overheating and it's still getting a good connection with the radio. This is most dangerous when you're armed and flying several kilometers/miles out, as this could mean a sudden Failsafe.
- Connection Indicator
-
Shows the current RC Link status. When not connected to any receiver, it will show a dash (
-); while aCshows up when bound and connected.
The Model Mismatch message will also show up to indicate you are connected to a receiver, but the model selected on your radio is incorrect. See the Model Match page for more info about Model Matching.

The Armed message will show up if you have the Arming Switch active (High, ~2000us). This is meant to warn users that changing parameters could result in a desync or disconnection with a receiver, resulting into a FAILSAFE.
If you do not meant to have your system Armed and ready for flying, make sure to toggle this switch to the Disarmed position (Low, ~1000us). Update your CH5 settings on the radio so that the output of this switch is correct (Low = disarmed; High = armed). See Switch Configs.

WARNING
Do not change parameters while ARMED. When a parameter is changed, the module goes into Parameter Commit mode, interrupting the normal loop. This could result in a desync on some hardware combination which would result in a FAILSAFE.
Version Line
The Version Line, found near the bottom of the Lua Script, indicates the firmware version flashed into the Device. This is present on both TX Modules and Receivers.
From these examples:
-
3.3.0- The numerical Version Number, in the form ofMajor.Minor.Patch.- See semantic versioning scheme for the origins of these numbers.
-
ISM2G4- The Regulatory Domain set into the Device. TX and RX Regulatory Domains should match. -
ae9df3- The Git commit hash for the version or branch.
Folder Titles
Items with > before the name is a folder that when selected shows another level of customization. TX Power, VTX Administrator, Wifi Connectivity are examples of these items.
These items will now show what is currently set for the items within. An example would be on TX Power, which will show the current Power set, and if Dynamic Power is enabled, it will show the current set Max Power, followed by the indicator Dyn.
RF Band
This option is only available for RF modules capable of Dual-Band operation.
The following options will be available:
-
X-Band
- Gemini X-Band (Crossband) or GemX mode; Simultaneous operation in 900MHz and 2.4GHz Band. Available only to modules with Dual LR1121 RF chips like the Nomad, Internal GX12 GemX module, Bayck Dual-Band Gemini External modules, etc. Will only sync or connect with GemX-capable receivers like the XR4, DBR4, GEPRC Gemini Xrossband, Bayck Dual Band, etc.
-
2.4GHz
-
900MHz
Packet Rate and Telemetry Ratio
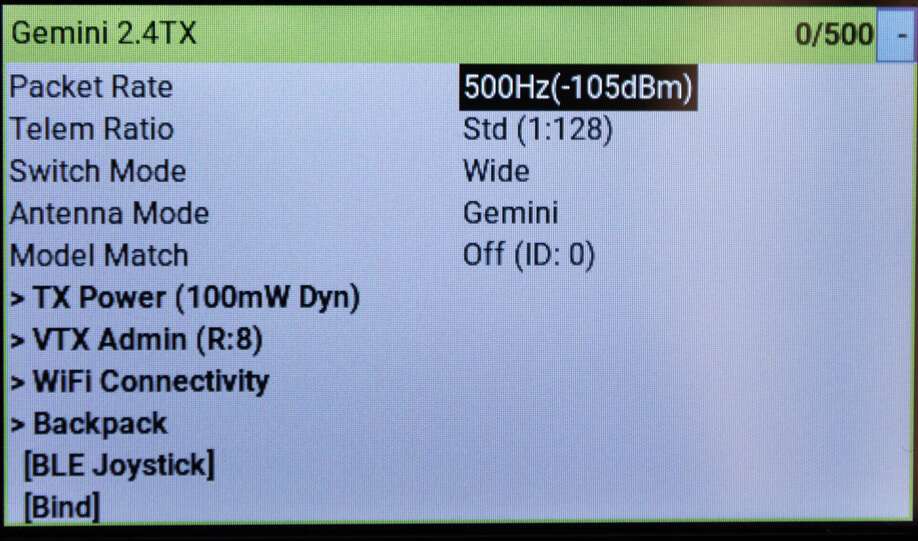
These are shown as Packet Rate and Telem Ratio in the Lua script, which allows you to change your performance parameters.
-
Packet Ratesets how fast data packets are sent, higher rates send packets more frequently and have lower latency.The following options are available for
2.4GHz:50Hz, 150Hz, 250Hz & 500Hz: Lora-based options. Higher means lower latency at the expense of sensitivity. Since v1.0.F500 & F1000: Pure FLRC for lowest latency, reduced range compared to LoRa, 500Hz and 1000Hz. DetailsD250 & D500: Redundant transmit FLRC modes.Dstands forDéjà Vu, 250Hz and 500Hz. Higher latency, reduced packet jitter and higher LQ. Same range as other FLRC modes. Details100Hz Full & 333Hz Full: Lora-based 10-bit Full Resolution with 8ch/12ch/16 Switch Mode options. DetailsK1000 : K modes for 2.4GHz are FSK+FEC (Forward Error Correction a.k.a self healing packets) and only available on LR1121 hardware. K modes are very similar to FLRC in their over the air properties and designed for high noise environments such as racing events. FSK Details FEC Details
DK250 & DK500 : These modes offer the same redundancy as D modes but with K modes (FSK+FEC).
The following options are available for
900MHz:25Hz, 50Hz, 100Hz & 200Hz: LoRa-based options. Higher means lower latency at the expense of sensitivity. Since v1.0.100Hz Full: Lora-based 10-bit Full Resolution with 8ch/12ch/16 Switch Mode options. DetailsD50Hz: Lora-based Redundant transmit mode via DVDA. Details250Hz: Only Available for GemX Devices. Details200Hz Full : Only Available for GemX Devices. DetailsK1000 Full : K modes for SubGHz are FSK and only available on LR1121 hardware. This mode is design for the highest data throughput when using protocols such as MAVLink. Details
The following options are available for
GemX:X150Hz : Crossband mode, combining 900MHz and 2.4GHz in Gemini Mode.X100Hz Full : Crossband mode, combining 900MHz and 2.4GHz in Gemini Mode, Full Resolution with 8ch/12ch/16 Switch Mode options
GemX is a 3.4.0 feature
Gemini Crossband (GemX) is available on select hardware, requiring the LR1121 RF Chip. GemX is an ExpressLRS 3.4.0 feature. Details here.
The number following the rate in parentheses (e.g. -105dBm for 500Hz) is the Sensitivity Limit for the rate, the lowest RSSI dBm value where packets will still be received. See Signal Health for more information about the sensitivity limit.
WARNING
Never change the packet rate while flying as this FORCES A DISCONNECT between the TX and RX.
-
Telem Ratiosets the telemetry ratio or how much of the packet rate is used to send telemetry. The options, in order of increasing telemetry rate, are:Off, 1:128, 1:64, 1:32, 1:16, 1:8, 1:4, 1:2. A Telem Ratio of 1:64 means one out of every 64 packets are used for telemetry data.- v3.0 comes with
StdandRaceoptions.Stdchanges ratio depending on the Packet Rate, andRaceis the same as Std, but will disable telemetry and sync while Armed.
For information on telemetry setup, see First Flight: Telemetry and Telemetry Bandwidth.
- v3.0 comes with
Switch Mode
The Switch Mode setting controls how channels AUX1-AUX8 are sent to the receiver (the 4 main channels are always 10-bit). The options are Hybrid & Wide. Hybrid mode is 6x 2, 3 or 6-position + 1x 16-position, and Wide is 7x 64 or 128-position. For detail about the differences, see the Switch Configs documentation.
In full resolution modes, the Switch Mode parameter selects the number of channels to be used. Full Resolution Switch Modes
Hot Tip
The Switch Mode can only be changed when not connected to a receiver. The top right corner of the Lua script will show a - if you're not connected.
Antenna Mode
This option is only available to Gemini-capable TX Modules. See the Gemini Page for more details.
Available Options:
-
Gemini- Transmit on two TX antennas simultaneously at different frequencies 40MHz apart (for 2.4GHz) or ~10MHz apart (for 900MHz).
-
Ant 1/Ant 2- Transmit only on one antenna.
-
Switch- Alternate between the two Antennas. See PR 2002 for more details.
WARNING
When using a Gemini TX with a non-Gemini receiver, you should set the TX in either Switch or Single Antenna (Ant1/Ant2) Mode.
The reason is that as the receiver only get the signal from the TX it has synchronized with, the other TX will emit signals uselessly in the other frequency and increase both the noise floor and power consumption.
Starting with ExpressLRS 4.0:
- X-Band or X Modes (X150 or X100 Full Res) will lock this to
Gemini, since both RF paths will be in use in these modes. - If a bound/connected/in-sync receiver isn't capable of Gemini mode (Single Antenna or Antenna-Diversity receivers), Antenna Mode will be set to
Switch.
Link Mode
Introduced in 3.5.0, Link Mode changes the main protocol and function of the TX module.
-
Normal- This is the default configuration. The TX module simply sends the commands from the radio handset, and receive telemetry from the receiver and send it to the handset. -
MAVLink- This option enables native MAVLink Telemetry downlink and Radio Control uplink making the TX module and radio handset to be an intermediary between a GCS and a MAVLink-capable craft. See the MAVLink page for more details.
Model Match
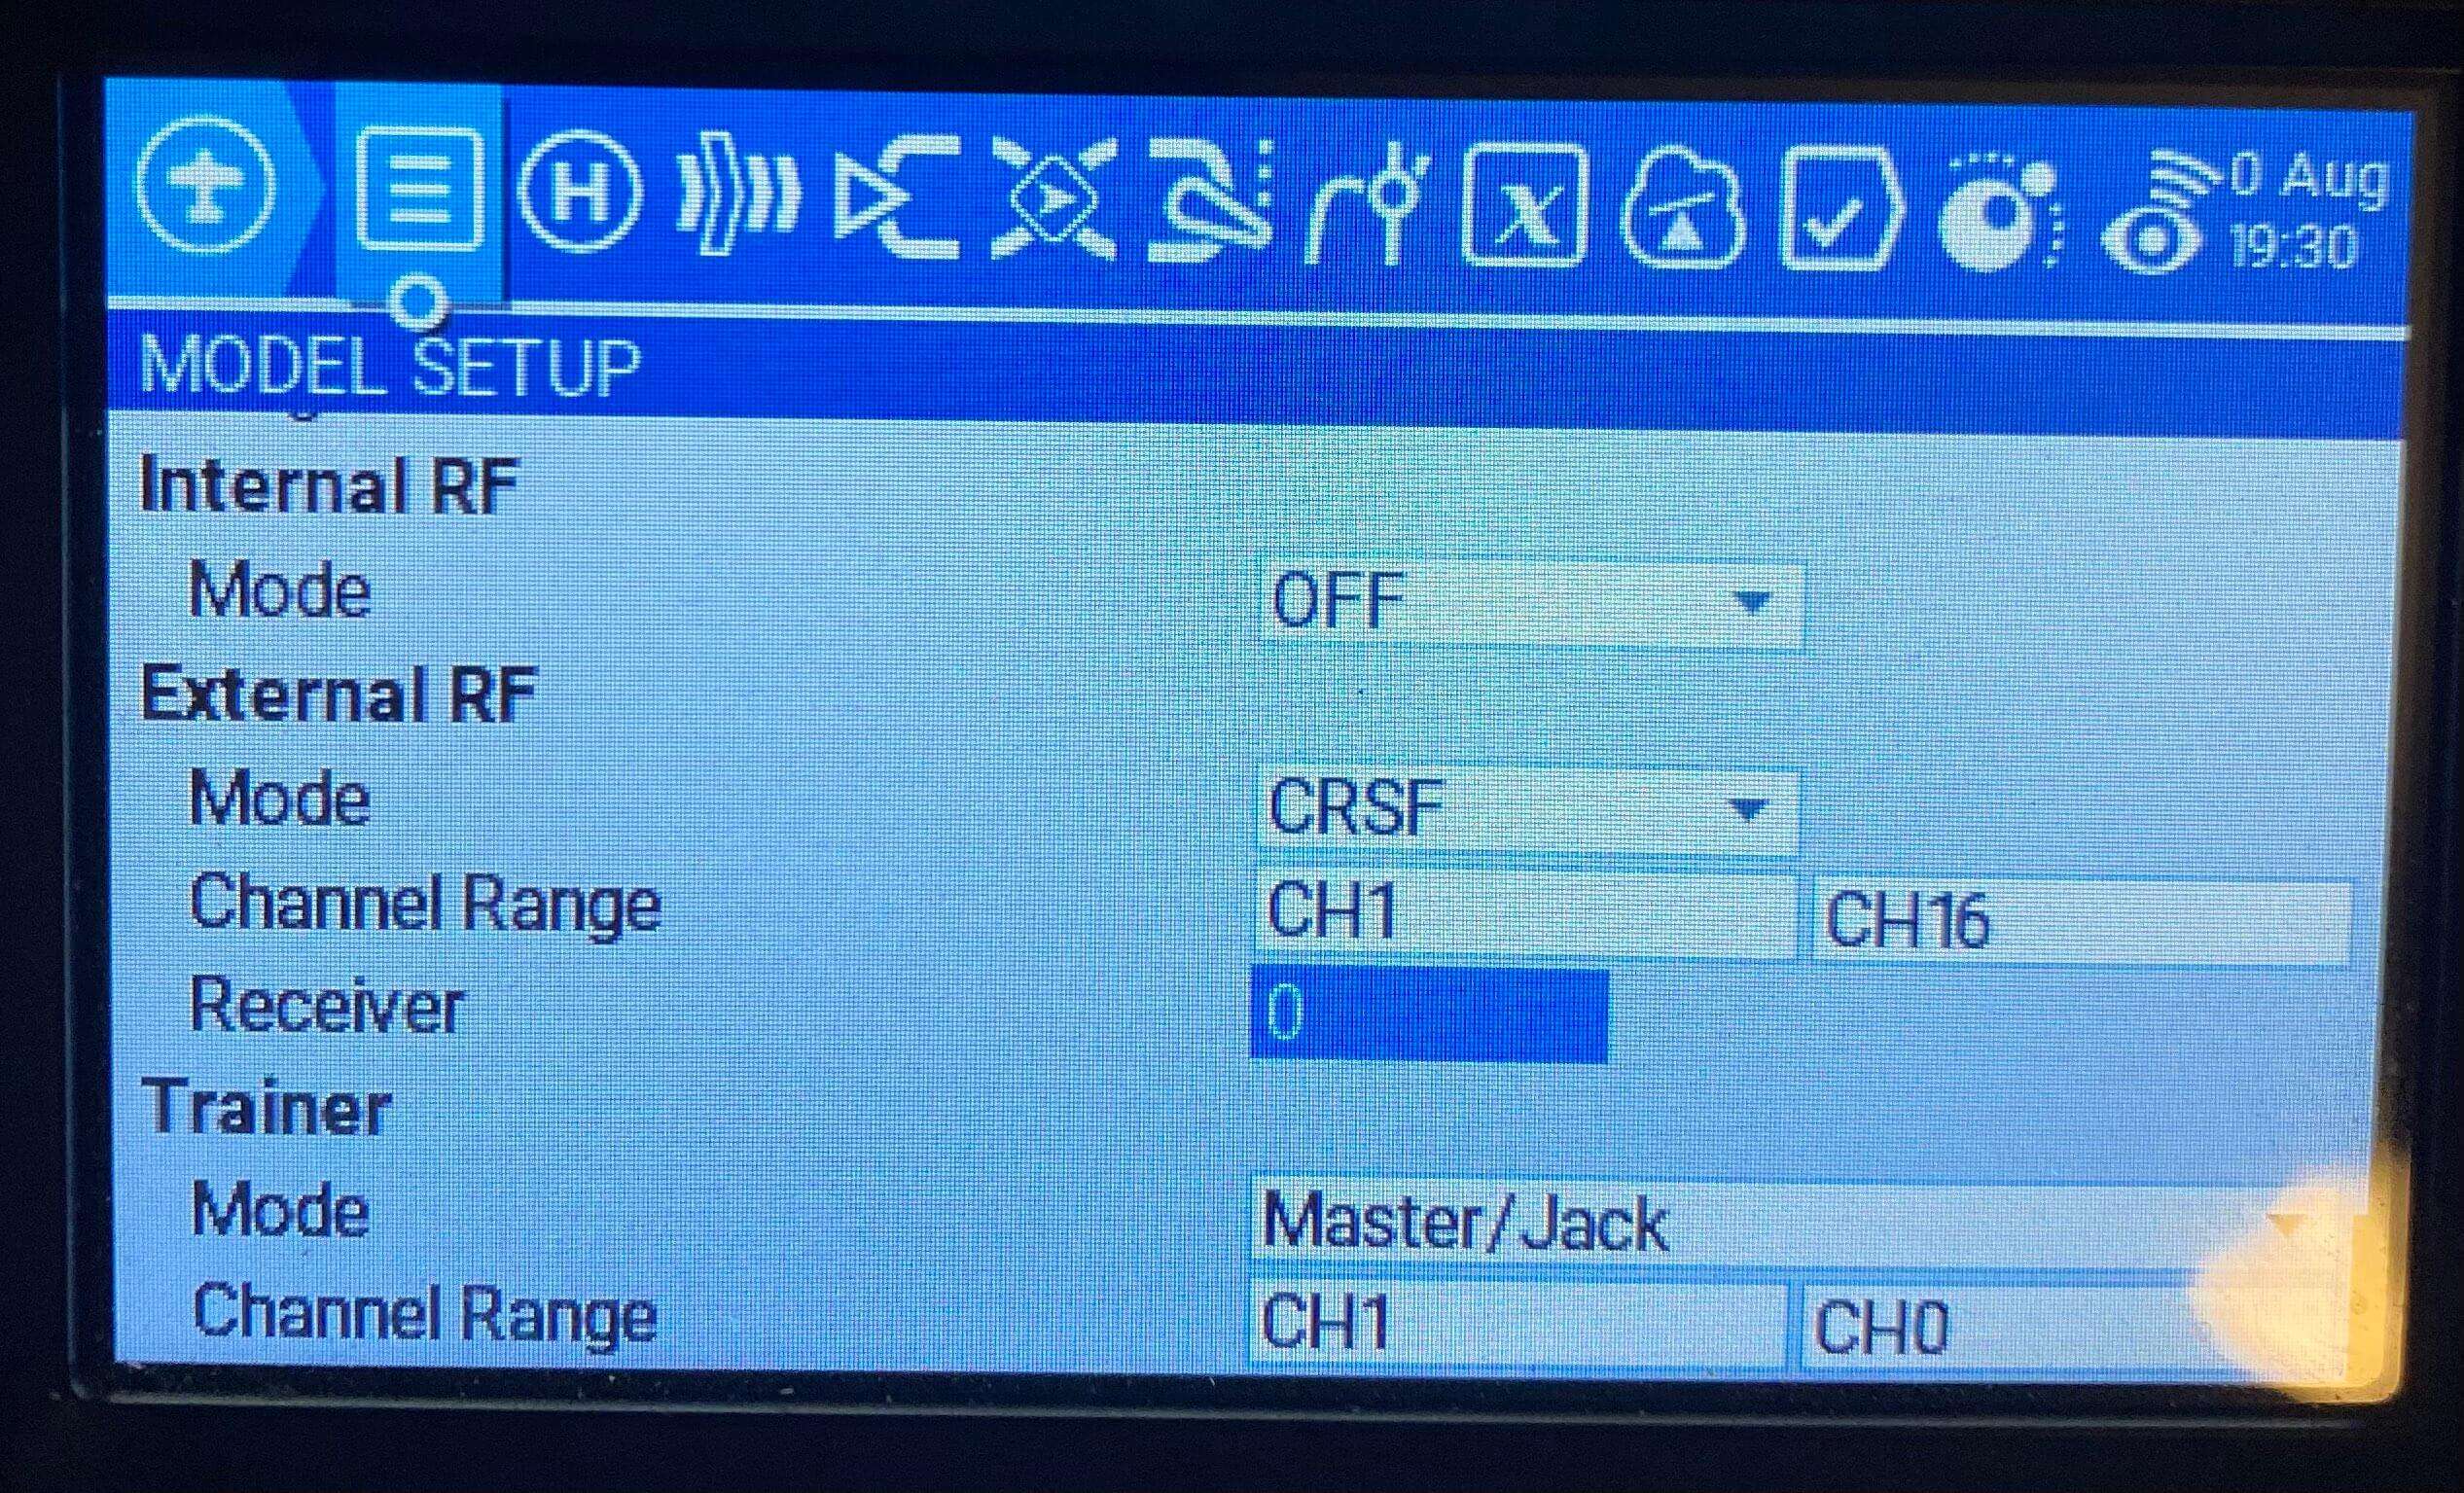
ExpressLRS supports multiple configuration profiles, and the configuration profile is selected by setting the "Receiver ID" property in the Radio Handset's Model Setup -> Internal/External RF -> Receiver (number).
Model Match is used to prevent accidentally selecting the wrong model in the handset and flying with an unexpected handset or ELRS configuration. Setting this to On while a receiver is connected will make that receiver only connect with the current Receiver ID. Setting it to Off will allow a connection with any bound receiver (including those using a Bind Phrase). Both sides of the connection must agree on their Model Match setting. For a detailed explanation of how this restricts connections see Model Match.
The Receiver ID of the active model is shown after the option value.
TX Power
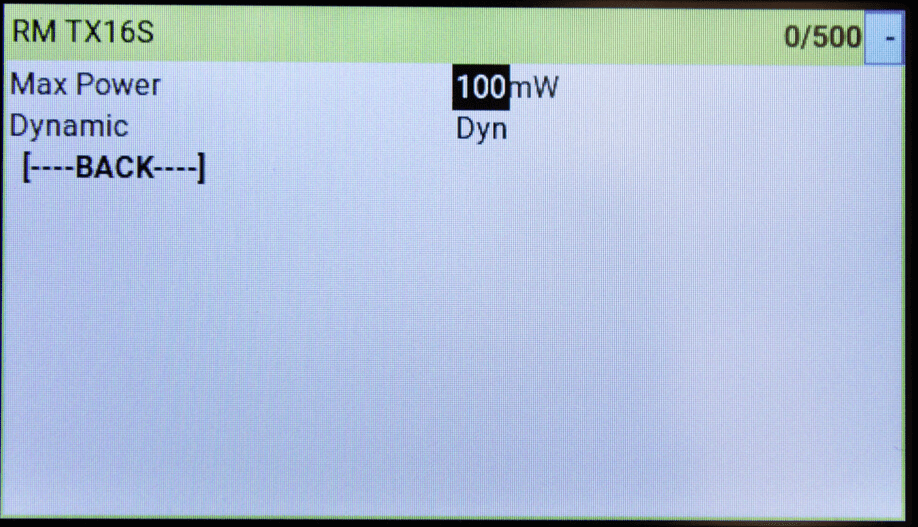
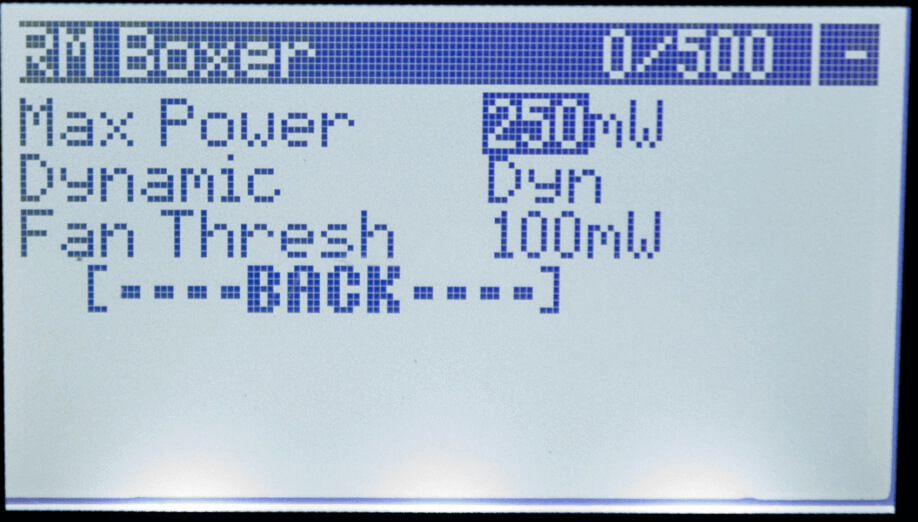
The TX Power folder is where you can change your TX Module's Transmission Power settings. Press Enter once to access the settings and Press the RTN key to go back to the previous page.
-
Max Powersets the maximum power level your TX will transmit at. Selecting a power level higher or lower than your TX supports will revert to the closest supported level. The options are10, 25, 50, 100, 250, 500, 1000 & 2000mW. If Dynamic Power is set toOffthis is the power level your TX always uses. -
Dynamicenables the Dynamic Power feature.Offmeans that the TX will transmit at Max Power at all times.Dynmeans the TX will dynamically lower power to save energy when maximum power is not needed. The optionsAUX9, AUX10, AUX11, AUX12indicate that the TX can be changed from max power to dynamic power by changing the position of a switch. where switch HIGH (>1500us) = dynamic power, switch LOW (<1500us) = max power. For more information, Dynamic Transmit Power provides a deeper dive into the algorithm and usage. -
Fan Threshsets the power level the Fan should activate, e.g. if set to 100mW, then the fan should spin up if you setMax Powerto 100mW withDynamicset to OFF after a short delay. The fan will continue running for some time even after the power level goes below the threshold. Not all modules have a Fan header that benefits from the setting. . Default fan threshold is 250mW.
VTX Administrator
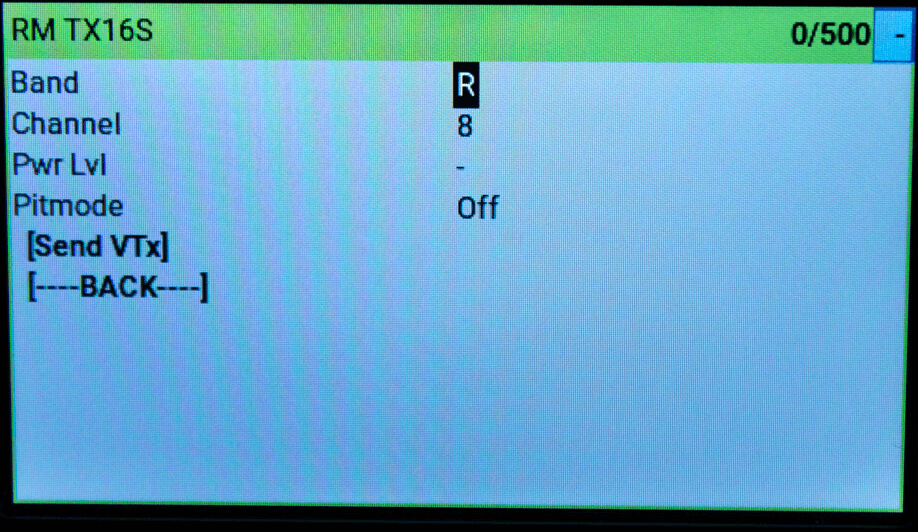
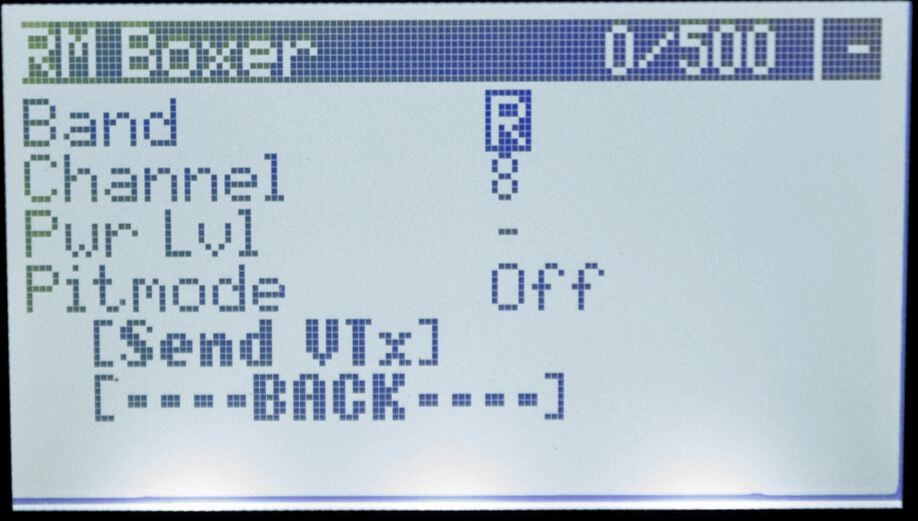
VTX Administrator allows you to change your VTX settings directly from your radio, and have those VTX settings be applied to any receiver you connect to. The VTX settings are sent every time a new connection is acquired, or when [Send VTX] is pressed.
Hot Tip
VTX Administrator will send the current VTX settings to the flight controller whenever the TX module detects a connection to the RX. This means that it will resend them after telemetry lost/recovered. So if you have used any other method to change the VTX power level (i.e. OSD), then that will be overridden if you lose/regain telemetry in flight.
-
Bandsets the VTX band, the options areOff, A, B, E, F, R & L, the standard analog FPV bands.Offmeans that VTX Administrator will not adjust any VTX settings. -
Channelsets the VTX channel, the options are1, 2, 3, 4, 5, 6, 7 & 8which are the standard channels in the above bands. -
Pwr Lvlsets the VTX power by index, the options are-, 1, 2, 3, 4, 5, 6, 7, & 8which are the power levels that your VTX can do. Refer to your VTX table settings on the flight controller for the exact power levels. For example a VTX may have 1 = 25mW, 2 = 100mW, 3 = 200mW, 4 = 500mW. -
Pitmodethe options areOn & Offwhich allow you to quickly switch into or out of pit mode -
Finally pressing the
[Send VTX]button sends the configured settings to the receiver and on to the VTX. These settings are also sent every time a connection is established.
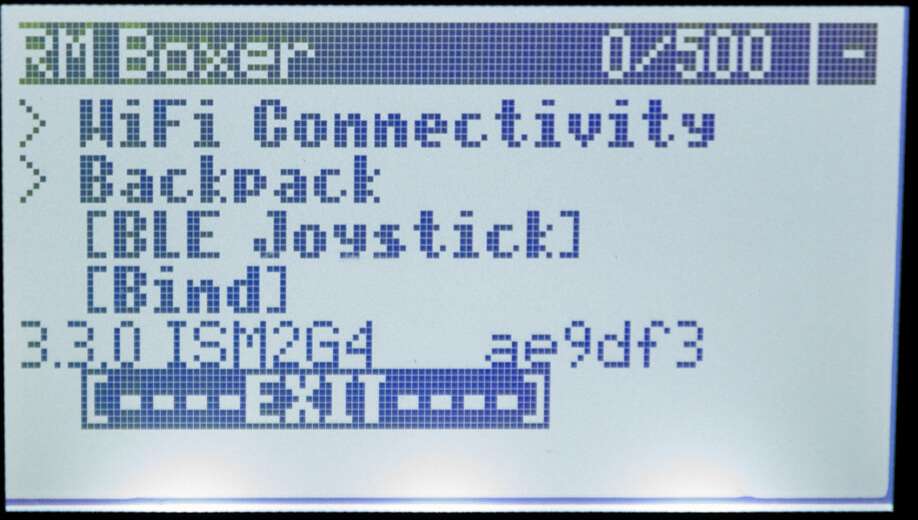
WiFi Connectivity
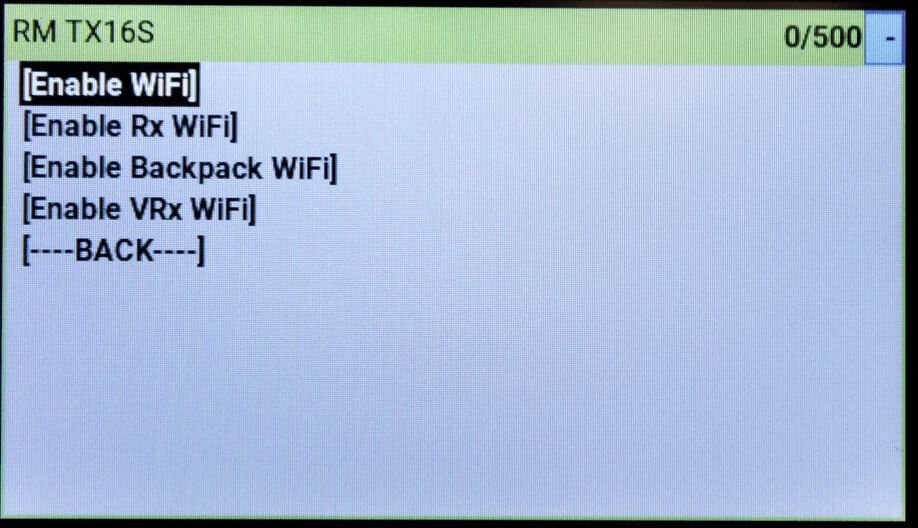
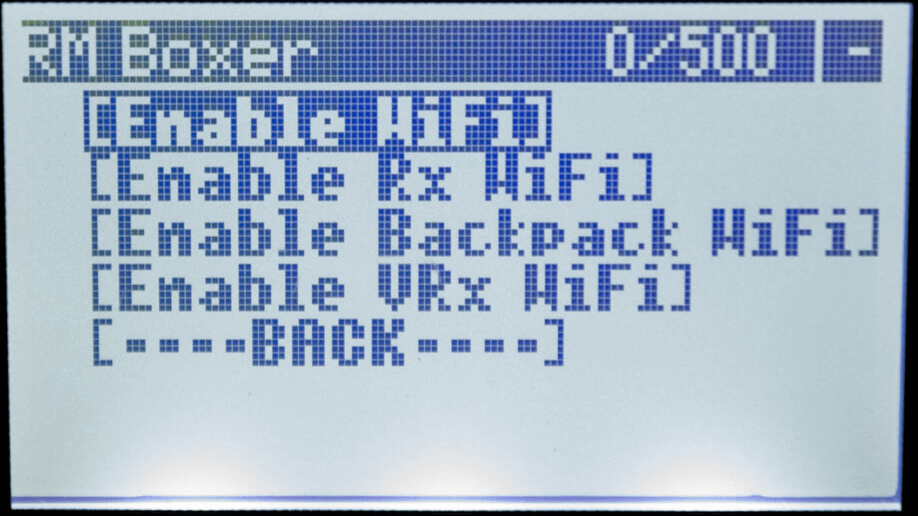
This section contains all the WiFi-related functions.
-
Enable WiFiwill activate the TX module WiFi mode for updating via WiFi (if the TX Module has WiFi Capabilities). Visit this page for instructions on how the updating process works. -
Enable RX WiFiwill put the bound and connected receiver into WiFi mode to facilitate updating via WiFi (if the receiver has WiFi capabilities). -
Enable Backpack WiFiwill put the TX Backpack into WiFi mode (available only to TX modules with backpacks connected and updated to the new Backpack firmware). -
Enable VRX WiFiwill put the VRX Backpack that is bound and connected to the onboard TX Backpack into WiFi mode to facilitate updating via WiFi.
Backpack Options
The parameters in this folder enables you to change the Backpack-related parameters.
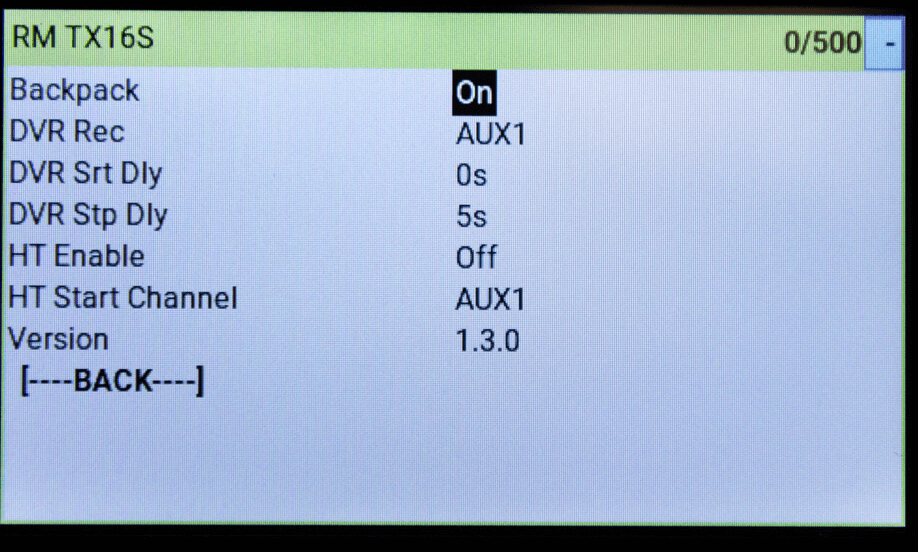
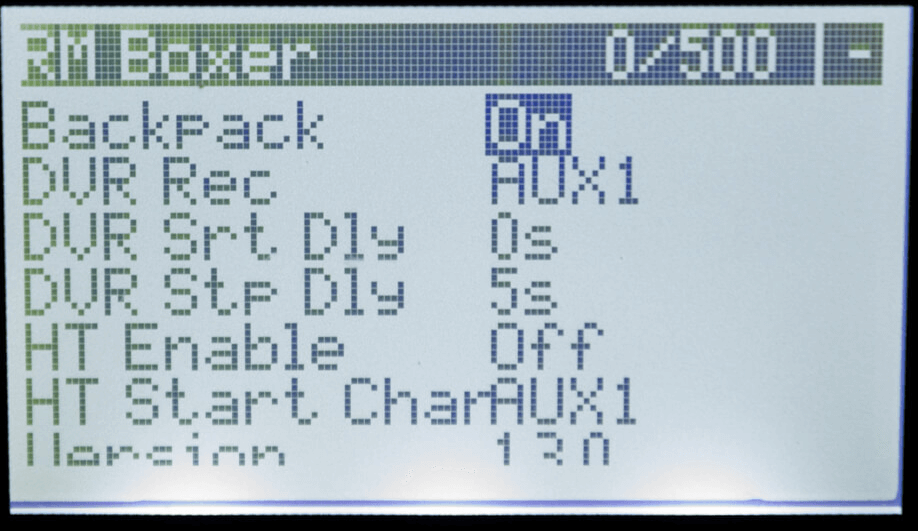
Backpack- Turn the Backpack function On or Off.DVR Rec- Set which Aux Channel and what channel position will trigger DVR Recording on the goggles. Only possible on FPV Goggles with VRX Backpack integration.DVR Srt Delay- How soon should the DVR start Recording upon activation of the Aux switch?DVR Stp Delay- How soon should the DVR stop Recording upon deactivation of the Aux switch?HT Enable- Turn Headtracking On or Off. Only available on some FPV Goggles with VRX Backpack integration.HT Start Channel- Starting Channel to send Head Tracking positions to.Telemetry- Allow the Backpack to Send the Telemetry frames via ESPNOW. See Backpack TelemetryVersion- The Backpack Firmware version flashed into the TX Backpack.
For more information, see the Backpack Guide.
Bind
Take Notice!
This command will only work on receivers that are already in Bind Mode (indicated by two blinks LED pattern). Receivers (with version 3.3.2 and earlier) flashed or set with a binding phrase will NOT go into this Bind Mode, and thus this command will not do anything.
Devices with the same binding phrase and compatible firmware versions should automatically sync/bind upon power up.
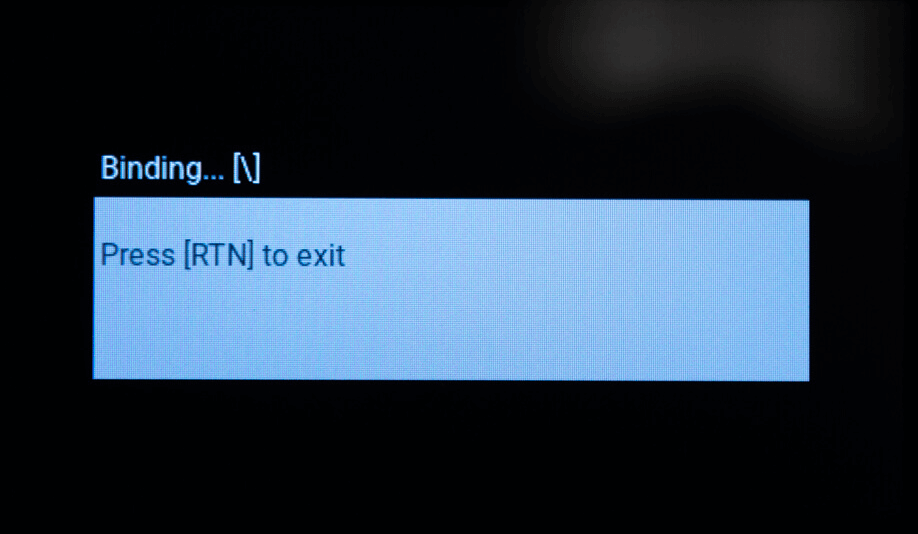
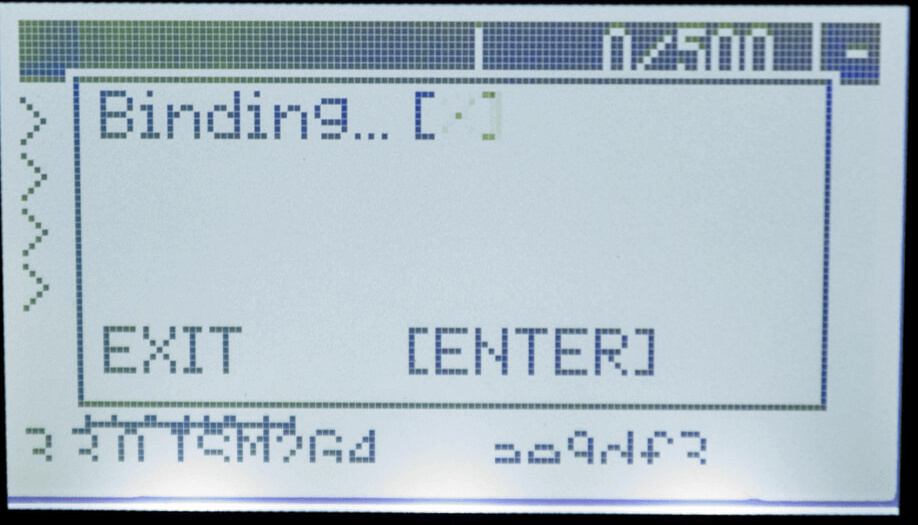
Pressing the [Bind] button activates the binding mode for traditional binding. This does nothing for users who have configured a bind phrase and is not needed. For more information check out this page on binding.
BLE Joystick (ESP32 TXes Only)
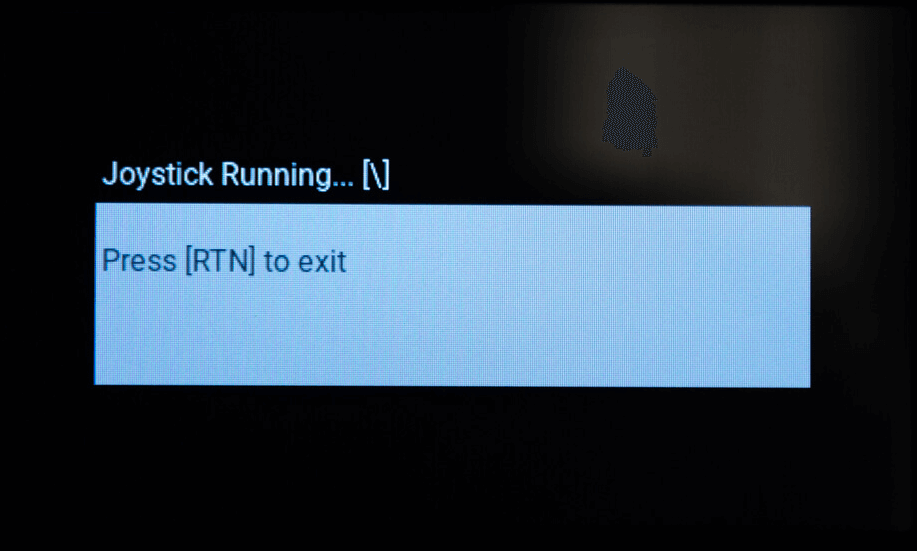
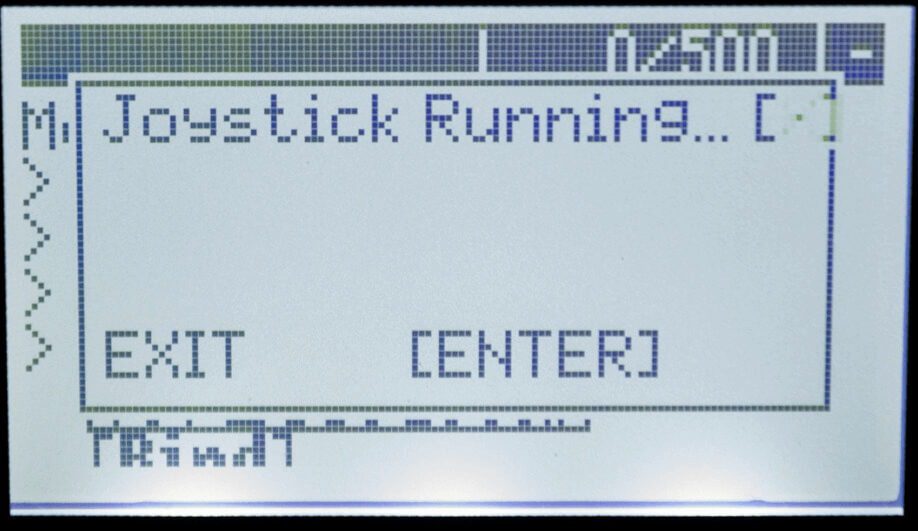
Pressing the [BLE Joystick] selection activates BluetoothLE Joystick mode which allows connection to simulators through the bluetooth of your computer. Reboot or change models to exit this mode.
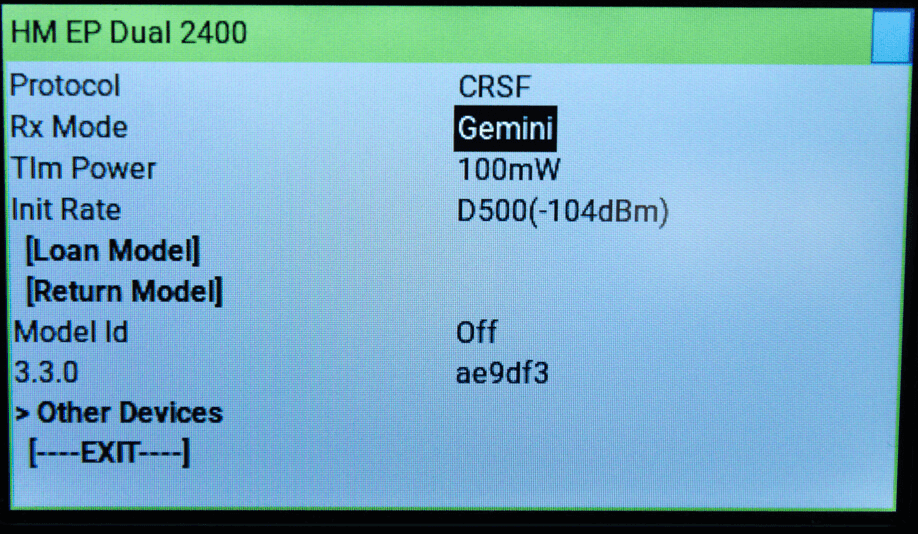
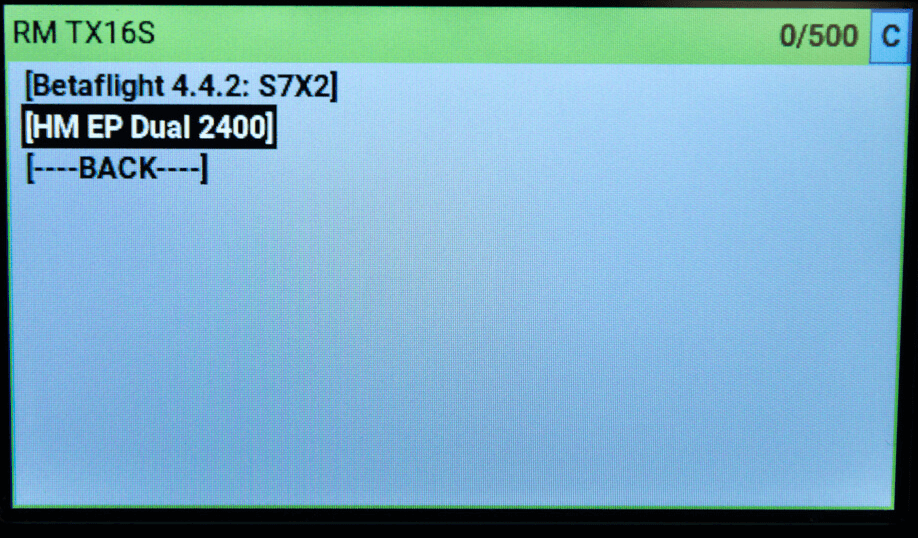
Other Devices
The Other Devices folder, if present, allows changing the configuration of other connected devices, such as the current receiver. It is also used to go back to the TX Module options.
Receiver Options
If the connected receiver is a PWM receiver, you will also have options to set Output Mapping and Failsafe Position. Pressing the Output Mapping control will open the output mapping sub-menu.
The controls here are similar to what you see on the Connections tab in the Web UI. So,
Output Ch- selects the actual PWM channel you are managing. When you change this value, the other inputs will be changed to the current values configured in the receiver for that channel and you can view or change them.Input Ch- selects which over-the-air channel to route to the selected output. For example, if you are using traditional Channel 5 ARM but you don't want to lose the use of PWM Output 5, you can map input channel 6 to output channel 5.Output Mode- selects the output frame rate. 50Hz is default but some servos allow 100Hz or other values. You can also select other protocols, such as Serial (if the receiver supports Serial out on that channel, DSHOT, etc.)Invert- selects whether to invert the output.
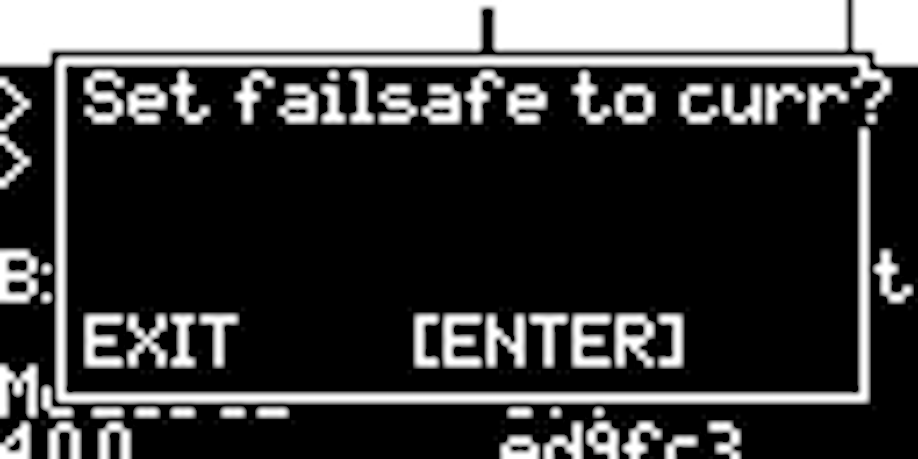
Pressing the [Set Failsafe Pos] button will bring up the failsafe setting menu. This allows you to set the positions the PWM channels will move to if the receiver loses signal. Note that, unlike in the Web UI, you can only set the failsafe values to the current channel positions.
If you are using a version of ExpressLRS earlier than 4.0, you will also see an Rx Mode field which will let you select the receiver's diversity mode. In 4.0, this is negotiated between transmitter module and receiver and thus the field is missing.
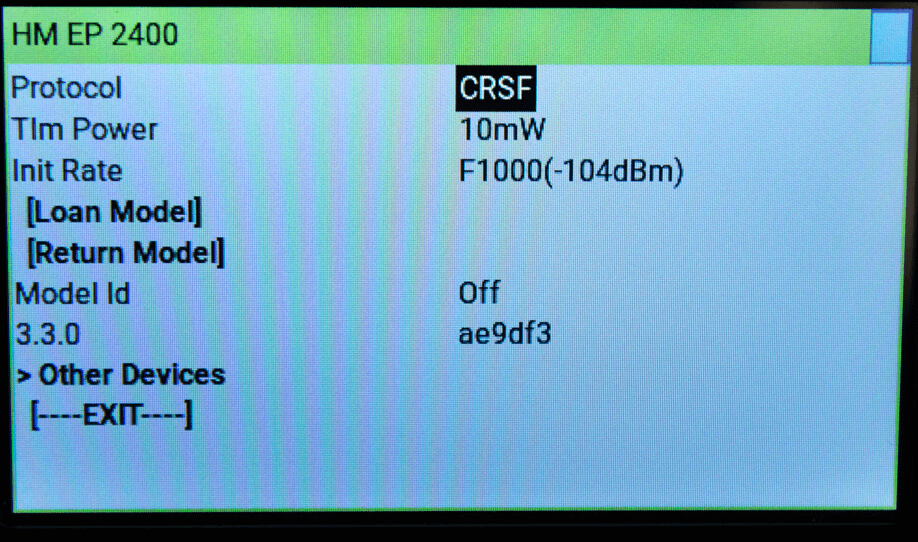
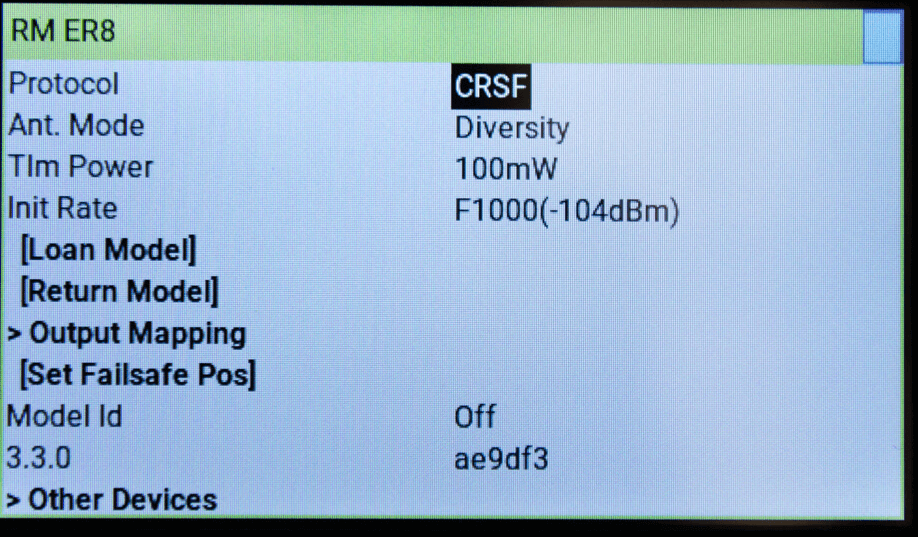
Protocol
The Protocol setting controls the output of the connected receiver. The following options are available:
CRSF- The regular CRSF Protocol Output. Recommended for most application.Inverted CRSF- The CRSF Protocol inverted for use in Flight Controllers that doesn't have any other UARTs available and the only option is to connect the receiver TX pin into an SBUS pad (Inverted RX). This is the oldInvert TX Pinoption.SBUS- Lets the receiver output SBUS signal for use with devices that don't support CRSF protocol, like Stabilizers, Heli Controllers etc.Inverted SBUS- Like the above, but inverted.SUMD- Lets the receiver output Graupner HoTT SUMD signal for use with devices that don't support CRSF protocol, like Stabilizers, Heli Controllers etc.DJI RS2 Pro- Mainly used for the RS2 Pro GimbalsDisplayPort- For controlling (primarily) DJI Air units to take them out of Low Power mode. New in ExpressLRS 4.0.HoTT Telemetry- Allows to use Graupner HoTT enabled telemetry sensors (Graupner and 3rd party)MAVLINK- Introduced on ExpressLRS 3.5.0, it allows the receiver to output native MAVLink into a flight controller. See the MAVLink page for more details.
For more information, see Receiver Serial Protocols
Protocol 2
The Protocol 2 setting is only available for ESP32-based receivers. This include the True Diversity ones like the RP4TD, Super D, Super P and EP Dual. These receivers have a second UART that can be used for the same purpose as the main UART. Note that not all of the ESP32-based receivers have the extra UART pads or pins exposed for easy use.
It has the same options as the setting above with these additional ones:
Tramp- If you want to control a VTX using Tramp protocol directly through the ExpressLRS Lua Script's VTX Admin.SmartAudio- If you want to control a VTX using SmartAudio protocol directly through the ExpressLRS Lua Script's VTX Admin.Off- Set when the auxiliary UART is not in use.
This setting is available on ExpressLRS 3.5.0 and onwards. See PR 2605 for more details.
SBUS failsafe
SBUS Failsafe is used to set the behavior of a receiver using SBUS protocol for output. The following options are available:
No Pulses- When a failsafe occurs, the receiver will stop sending any messages.Last Pos- When a failsafe occurs, the receiver will keep sending the last channel positions it received along with the Failsafe bit.
Antenna Mode
The Antenna Mode setting is only available for Receivers with Antenna Diversity. These options are available:
Diversity- Both Antennas will be active. Receiver will switch to the antenna with better RSSI.Ant1/Ant2- Only one antenna will be enabled (for both RC command reception and Telemetry sending).
Receiver Mode
The Receiver Mode setting is only available for True Diversity receivers. These options are available:
Gemini- Receive on two RX antennas simultaneously at different frequency 40MHz apart (for 2.4GHz) or ~10MHz apart (for 900MHz). Best used when you have a Gemini-capable TX Module.Diversity- Both Antennas will be active. Receiver will switch to the antenna with better RSSI.
In ExpressLRS 4.x this option has been removed and the receiver's Antenna Mode is managed by the TX module's setting and the receiver's capabilities during sync.
Tlm Power
The Telemetry Power setting is used to adjust the telemetry transmit power of the receiver. This option is only available on receivers with a Power Amplifier.
The MatchTX setting will automatically change the telemetry output power to match what the transmitter reports it is using. In MatchTX mode, the receiver will boot at default power output (usually maximum power) until a power update is received from the transmitter, which is only available in Wide Switch Mode or any FullRes mode.
Init Rate
Removed in ExpressLRS 3.4, see Init Rate. The Initialization Rate setting controls the packet rate that the receiver will start checking for the Sync Packet. On boot, the receiver will listen for the Sync Packet starting with the fastest RF Mode or Packet Rate, down to the slowest, then cycles, until it finally Syncs and Binds. Setting this parameter closer or equal to the Packet Rate you've set for the TX module will allow the receiver to Bind or Connect much faster.
Team Race
Team Racing allows selection between multiple connected models, failsafing all unselected models. See Team Racing
Channel(default CH11 / AUX7) TeamRace Channel - The channel that is checked on the receiver to determine the currently selected model. Has no effect if the TeamRace Position is set to Disabled.Position(default Disabled) TeamRace Position - Which position of the TeamRace Channel activates this model. 6-position switches are supported (1-6) as well as Low/Mid/High for using a 2 or 3-position switch.
Loan Model/Return Model
These commands allow the user to Loan/Return the model. For more information, see the Loan Model guide.
This is deprecated and removed in ExpressLRS 3.4.0 in favor of the new Binding Procedures. See the binding page for details or the Bind Storage section below.
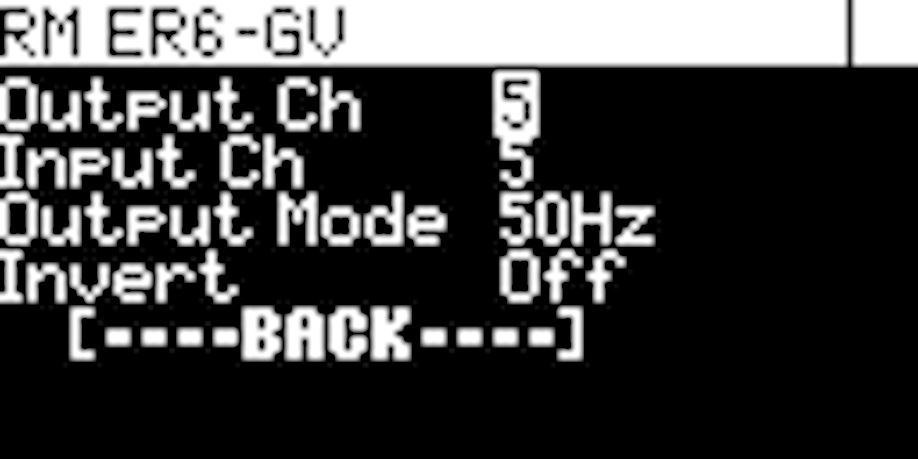
Output Mapping
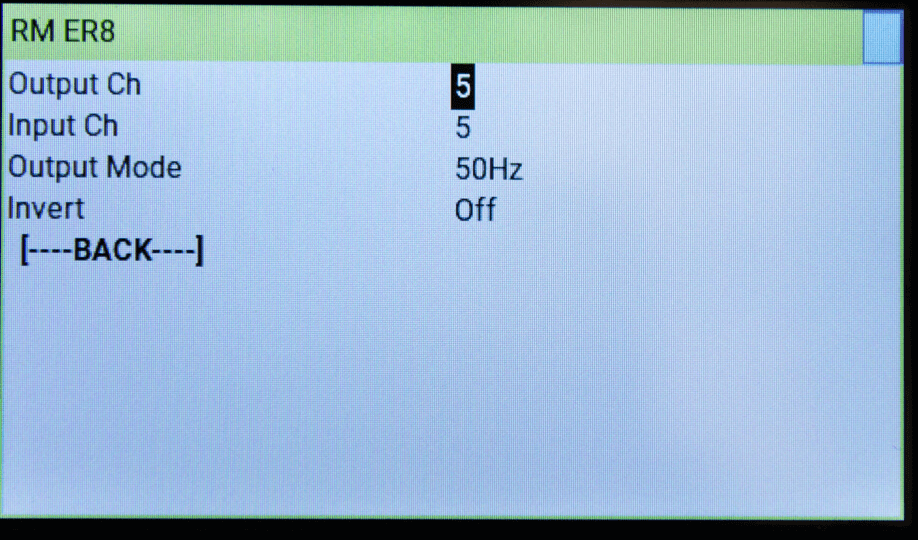
This folder is only available to PWM receivers. This will allow users to set options for each of the output pins of their PWM receivers.
Output Ch- Select the Channel or Pin in the PWM receiver to change settings for.Input Ch- Select which Channel on your Radio Mix will send its output to the Receiver PWM Channel.Output Mode- Select the command rate for the Output Pin. Best to set this to the refresh rate of the servo or device.Invert- Set this option to On or Off to toggle the direction for the Output Channel.
For more information, see PWM Receivers page.
Bind Storage
Persistent- Binding info is kept across power-cycles.Volatile- Binding info is forgotten after a power-cycle.
This option is available on ExpressLRS 3.4.0 and newer. See the details here.
Returnable- Introduced in ExpressLRS 3.5.0. It is used to allow models to be safely loaned from a fleet if unbound OTA. A Binding Phrase must be set for this to work properly. see PR 2744 for details.
Enter Bind Mode command
This will put the receiver into Bind Mode. It works even if the receiver is already flashed with a binding phrase or already bound traditionally.
This command is available on ExpressLRS 3.4.0 and newer. See the details here.
Model ID
This line shows the currently set Model ID for the receiver when Model Matching is enabled. This number should match the Receiver ID set with the current active Model on the Radio handset, otherwise, there will be Model Mismatch! See Model Match for more details.
Recommendations
-
For racing where maximum performance is a must, the
500Hzmodes or faster, with theRaceTelemetry mode, is ideal.HybridSwitch Mode is also good here. -
For freestyle and general everyday flying, you may use the
250Hzmodes or faster, with theStdTelemetry mode. Switch Mode doesn't matter as much here. Select what's appropriate for your Flight Mode settings. -
For fixed wings, we recommend using
100Hz Full Res, together with eitherStdor your choice of Telemetry Ratio. Switch Mode will depend greatly on how many full resolution channels you intend to use. -
For Long Range applications, see the Long Range Records page and try the settings the pilots used to achieve the range. It is not guaranteed you'll achieve the same range as they are due to several factors like RF Noise in your area, your location and position and the antenna orientation on your aircraft and transmitter modules. Observe local laws and regulations.
Troubleshooting the Lua Script
ExpressLRS Lua Script is stuck at Loading...
ExpressLRS Lua Script is stuck at Loading...
Go back to the Radio Setup Guide and make sure your radio is prepped up for ExpressLRS. Check that the ExpressLRS TX module is enabled - otherwise the script cannot be loaded.
Also, make sure your module has been flashed with v3.0 firmware. V3 Lua for V3.0-flashed modules, V2 Lua for v2.x-flashed modules (including some modules fresh from the factory).
For newly-acquired ExpressLRS modules, flashing via USB is the recommended update method.
I cannot change the Switch Mode!
I cannot change the Switch Mode!
Changing switch modes requires that the TX module and Receiver aren't connected to each other (no C in the top right corner of the Lua Script). Power off the receiver first, change the Switch Mode from the Lua script, then power up the receiver. The Switch Mode should then apply.
I cannot change my Packet Rate to F1000!
I cannot change my Packet Rate to F1000!
F1000 requires higher than 400K baud rates. First update your baud rate setting either in the Model Setup menu or in the System Menu -> Hardware, reboot your radio to ensure that the baud rate setting got applied and then change the Packet Rate.
Do note that not every handset is capable of higher than 400K baud rates. See the Radio Setup Guide for the details.
I cannot change to Full Resolution Rates!
I cannot change to Full Resolution Rates!
As Full Resolution Rates call for an entirely different Switch Modes, you need to first disconnect the Receiver and the TX module from each other, like how you would change Switch Modes. Power down the receiver, change the Packet Rate to the Full Resolution modes, select your Switch Mode scheme and then power up the receiver or the aircraft.
VTX Admin is not working but I can change VTX channels via OSD Menu.
VTX Admin is not working but I can change VTX channels via OSD Menu.
As VTX Admin depends on MSP which then depends on Telemetry, ensure that you have Telemetry enabled on your FC Configuration and that you are getting more than 10 Telemetry Sensors on your Radio (Model Setup -> Telemetry page; Delete and Discover New sensors to refresh the sensor list.) Also, make sure Telem Ratio is not Off.
There is no C on the top right corner, and I'm not getting Telemetry in my radio!
There is no C on the top right corner, and I'm not getting Telemetry in my radio!
Make sure Telem Ratio is not set to Off. Set it to Std, or any other value other than Off.
On v1.x, I can choose 2W on the Lua, but I cannot do that anymore. What gives?
On v1.x, I can choose 2W on the Lua, but I cannot do that anymore. What gives?
This means your module cannot go that high or that low. The power levels you can select on the new Lua script are based on the power levels your module supports. This also applies to other options like Enable Backpack WiFi or BLE Joystick. If your module doesn't support any of these features, it won't show up on the Lua Script.